
Rio Dipladenia is a popular, vibrant garden plant that can bring a splash of tropical color to any outdoor space. Known for its striking trumpet-shaped flowers and lush green foliage, Rio Dipladenia is a favorite among gardeners for its aesthetic appeal and the vibrancy it adds to gardens. One of the key benefits of planting Rio Dipladenia is its attractive flowers, which bloom profusely throughout the growing season.
Furthermore, this plant is relatively easy to maintain, making it a great choice for both novice and experienced gardeners. Its versatility allows it to flourish in various settings, whether planted in garden beds, hanging baskets, or containers. Understanding how to plant Rio Dipladenia in garden beds is straightforward: choose the right location, prepare the soil, properly plant your Dipladenia, and provide consistent care. This guide will cover each step in detail to ensure your Rio Dipladenia thrives and enhances your garden’s beauty.

Choosing the Right Location
Sunlight Requirements
For optimal growth, Rio Dipladenia requires full sun to partial shade. The importance of providing the right amount of sunlight cannot be overstated; adequate light ensures that the plant thrives, displaying its vibrant flowers and lush foliage. Ideally, Rio Dipladenia should receive between 6 to 8 hours of sunlight per day.
While it can tolerate some shade, abundant light promotes healthier growth and more prolific blooming. Therefore, selecting a location in your garden that enjoys sufficient sunlight exposure is crucial for the success of your Rio Dipladenia.
Soil Conditions
Well-draining soil is essential to prevent root rot in your Rio Dipladenia. Waterlogged soil can lead to poor plant health and even death, making proper soil conditions a vital aspect of successful planting. You should amend your garden soil with compost or organic matter to enhance drainage and fertility.
Adding these components improves the soil structure and provides essential nutrients that benefit plant growth. To amend the soil, mix in a generous amount of compost or well-rotted manure into the top 6-12 inches of soil. This will ensure a nutrient-rich, well-draining environment, setting the stage for a flourishing Rio Dipladenia.

How to Plant Rio Dipladenia in Garden: Planting Rio Dipladenia
Selecting Healthy Plants
When choosing Rio Dipladenia plants from a nursery, it is important to select specimens exhibiting signs of good health. Look for plants with vibrant green leaves and robust, sturdy stems, as these are indicators of a healthy plant.
Avoid any plants that show signs of disease, such as discolored or wilted leaves or the presence of pests like aphids or spider mites. Healthy plants are more likely to establish well in your garden and will be better equipped to resist pests and diseases, ensuring a stronger start and more vigorous growth.
Spacing and Placement
Proper spacing and placement are crucial for the healthy growth of Rio Dipladenia. Plants should be spaced 12-18 inches apart. This spacing allows for sufficient airflow between the plants, which helps prevent fungal diseases and promotes stronger growth. Additionally, ample space ensures that each plant has enough room to spread and develop without competing for resources.
When positioning Rio Dipladenia plants, it is essential to plant them at the same depth they were in their nursery pots. This helps to avoid the stress of being planted too deep or too shallow, which can affect their growth and bloom. Carefully consider the layout of your garden bed, ensuring that each plant receives the recommended amount of sunlight and has enough space to thrive.
Planting Process
Planting Rio Dipladenia involves a few simple but important steps to ensure a successful establishment. Begin by digging a hole that is slightly larger than the plant’s root ball. This extra space allows the roots to spread more easily as they establish themselves in the new environment.
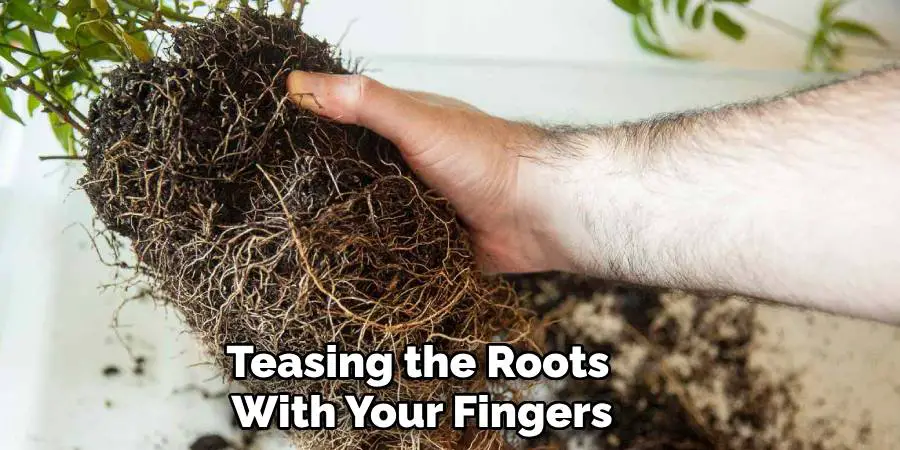
Next, carefully remove the plant from its container. If the roots are tightly bound or circling inside the pot, gently loosen them to encourage outward growth. This can be done by lightly teasing the roots with your fingers or trimming any excessively long ones.
Place the Rio Dipladenia in the prepared hole, ensuring it sits at the same depth as it was in the nursery pot. Backfill the hole with the soil you removed, gently firming it around the root ball to eliminate air pockets. This ensures good contact between the roots and soil, essential for proper water and nutrient uptake.
Finally, water the plant thoroughly to help settle the soil around the roots. Deep watering encourages the roots to grow downward, promoting a strong and stable root system. After planting, maintain a consistent watering schedule to keep the soil evenly moist but not waterlogged, which is vital for the plant’s initial establishment and growth.
How to Plant Rio Dipladenia in Garden: Watering and Mulching
Watering Requirements
Watering is crucial for the successful growth of Rio Dipladenia, especially during the initial planting phase. Immediately after planting, deep watering is essential to help establish the roots in their new environment. Make sure to water thoroughly so that the moisture reaches deep into the root zone, encouraging the roots to extend downward.
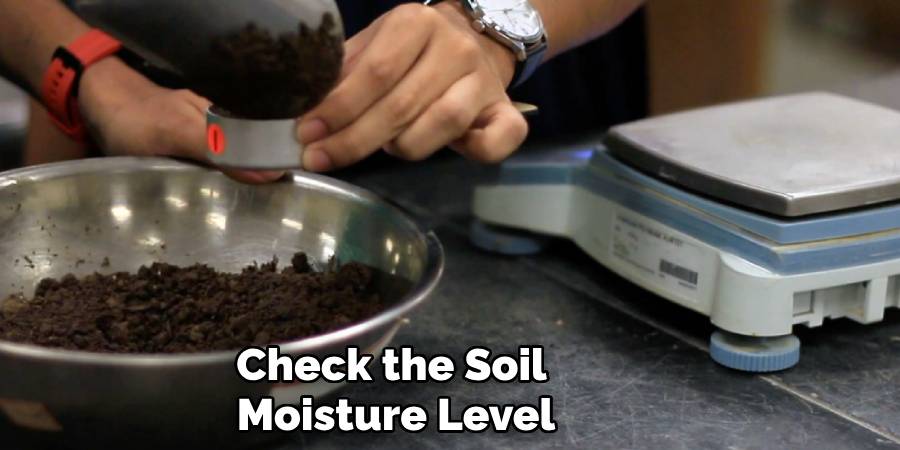
A regular watering schedule is key to keeping your Rio Dipladenia healthy. Aim to keep the soil consistently moist but not waterlogged. Depending on your local climate and weather conditions, watering once or twice a week is typically sufficient. Always check the soil moisture level before watering to avoid overwatering, which can lead to root rot and other issues.
Mulching
Applying a layer of mulch around the base of Rio Dipladenia plants provides several benefits. Spread a 2-3 inch layer of organic mulch, such as bark chips, straw, or compost, around each plant, ensuring it does not touch the stems directly. This mulch layer helps to retain soil moisture, reducing the need for frequent watering and ensuring the roots remain hydrated.
Additionally, mulching aids in weed suppression by blocking sunlight from reaching the soil, thereby reducing competition for nutrients. It also helps regulate soil temperature, keeping the roots cooler in the summer and warmer in the winter. Together, these benefits promote healthier and more vigorous growth for your Rio Dipladenia plants.
Supporting and Training
Using Supports
For climbing varieties of Rio Dipladenia, installing trellises or stakes can support healthy growth. Position the trellis or stake near the base of the plant at the time of planting, ensuring it is securely anchored in the soil. Gentle training of the vines to grow on these supports can be achieved by carefully tying the stems with soft ties and guiding them as they climb. Regularly check and adjust the ties to avoid constraining the growth.
Pruning and Maintenance
Pruning is essential for shaping Rio Dipladenia and encouraging bushier growth. Regularly trim the plant to maintain its desired size and form. Additionally, remove any dead or damaged leaves and stems to promote better air circulation and overall plant health. This enhances the plant’s appearance and reduces the risk of pests and diseases, ensuring your Rio Dipladenia continues to thrive.
Pest and Disease Management
Common Pests and Diseases
Rio Dipladenia plants are generally resilient, but they can still fall prey to common pests and diseases. Some frequent culprits include aphids, spider mites, and fungal infections.
Aphids are tiny, soft-bodied insects that suck sap from the plant, causing leaves to curl and turn yellow. Spider mites, on the other hand, are minuscule arachnids that create fine webbing on the undersides of leaves and lead to speckled, discolored foliage. Fungal infections like powdery mildew and root rot are also prevalent, especially in conditions of poor air circulation and excessive moisture.
Identifying Common Issues
Proper identification of pest and disease problems is crucial for effective management. Discolored leaves, such as yellowing or browning, can be a sign of aphid or spider mite infestations. Stunted growth or wilting may indicate root rot, often caused by overwatering or poor drainage. Fungal infections usually present as white powdery spots on leaves or stems and are more prevalent in damp, crowded conditions. Regular inspection of your plants allows for early detection and timely intervention, preventing extensive damage.
Prevention and Treatment
To prevent pest and disease problems, maintain a regular inspection schedule, ensuring you catch any issues early before they escalate. Proper spacing and good air circulation are key preventive measures, as overcrowded plants invite pests and diseases. Removing debris and dead plant material also helps minimize the habitats where pests can thrive.
When treatment becomes necessary, consider using organic insecticides and fungicides as first-line defenses, which are less harmful to beneficial insects and the environment. Manual removal of pests using water sprays or by hand can also be effective, especially for small infestations. By employing these preventive and treatment strategies, you can ensure that your Rio Dipladenia plants remain healthy and vibrant.

Winter Care
Protecting Rio Dipladenia in Colder Climates
In colder climates, Rio Dipladenia requires additional protection to survive the winter. For potted plants, bring them indoors before the first frost, placing them in a bright, cool location away from direct heat sources. For those planted in the ground, use frost covers or garden fabric to shield them from freezing temperatures. Overwintering tips include reducing watering to prevent waterlogged roots and refraining from fertilizing, as growth slows down during this period. Ensure your plants receive adequate light and monitor them for any signs of stress, ensuring they remain healthy and ready for the next growing season.
Conclusion
Successfully cultivating Rio Dipladenia in your garden involves several key steps. Begin by understanding how to plant it, ensuring thorough watering during the initial phase, and maintaining consistent soil moisture. Regular mulching, pruning, and proper support are essential for healthy growth. Vigilant monitoring for pests and diseases alongside preventive measures ensures your plants stay vibrant.
By adhering to these steps and providing regular maintenance and care, you can enjoy the stunning blooms and lush foliage of Rio Dipladenia, enriching your garden with its beauty. Thanks for reading our blog post about how to plant rio dipladenia in garden.
About
Outdoor Fixes is a distinguished figure in the world of Diy design, with a decade of expertise creating innovative and sustainable Diy solutions.
His professional focus lies in merging traditional craftsmanship with modern manufacturing techniques,
fostering designs that are both practical and environmentally conscious. As the author of diy,
outdoorfixes delves into the art and science of outdoorfixes-making, inspiring artisans and industry professionals alike.
Education RMIT University
(Melbourne, Australia) Associate Degree in Design (Outdoor Fixes) Focus on sustainable design, industry-driven projects,
and practical craftsmanship. Gained hands-on experience with traditional and digital manufacturing tools, such as CAD and CNC software.
Nottingham Trent University
(United Kingdom) Bachelor’s in outdoorfixes.com and Product Design (Honors) Specialized in product design with a focus on blending creativity with production
techniques. Participated in industry projects, working with companies like John Lewis and Vitsoe to gain real-world insights.
Publications and Impact
In diy, Outdoor Fixes his insights on indoor design processes, materials, and strategies for efficient production.
His writing bridges the gap between artisan knowledge and modern industry needs, making it a must-read for both budding designers and seasoned professionals.