
Storing sod properly is crucial for anyone involved in lawn installation, landscaping projects, or home improvement that depends on healthy, fresh grass. Temporary storage often becomes necessary due to delays in installation, sudden weather changes, or when large areas require staged work over several days.

Learning how to store sod the right way can mean the difference between lush, green coverage and wasted investment on spoiled grass. In this guide, you’ll discover step-by-step strategies that maintain sod vitality and usability, even if your project faces unexpected interruptions. By naturally weaving in the keyword “how to store sod,” we’ll help you prevent common pitfalls and safeguard the quality of your sod from the moment it arrives until it’s ready for installation.
Understanding Sod and Its Requirements
Sod is essentially mature grass and its underlying soil layer, bound together by roots. This living product is harvested in rolls or slabs to provide an instant lawn solution when installed on prepared ground. Unlike seeds, sod has immediate needs for moisture, fresh air, moderate temperatures, and gentle handling to preserve its health. Failure to meet these needs can quickly result in sod that dries out, overheats, or decomposes before it ever touches your soil.
Biological Needs of Sod
To maintain its green color and ability to root after installation, the sod must retain adequate moisture while allowing for air circulation around the roots. Too little water leads to dried, brittle grass, while excessive moisture and poor airflow foster mold and rot. Temperature is another key factor—heat buildup in tightly packed sod rolls accelerates decomposition, which is why ventilation matters just as much as hydration.
Sod’s health can be compromised by improper handling at virtually any stage, from harvest to installation. Dropping, stacking, or exposing sod to harsh sunlight adds to the stress that can reduce its ability to thrive once laid. By understanding these basic principles, anyone can take the right precautions to store sod and maximize its post-installation success.
Why Proper Storage is Crucial
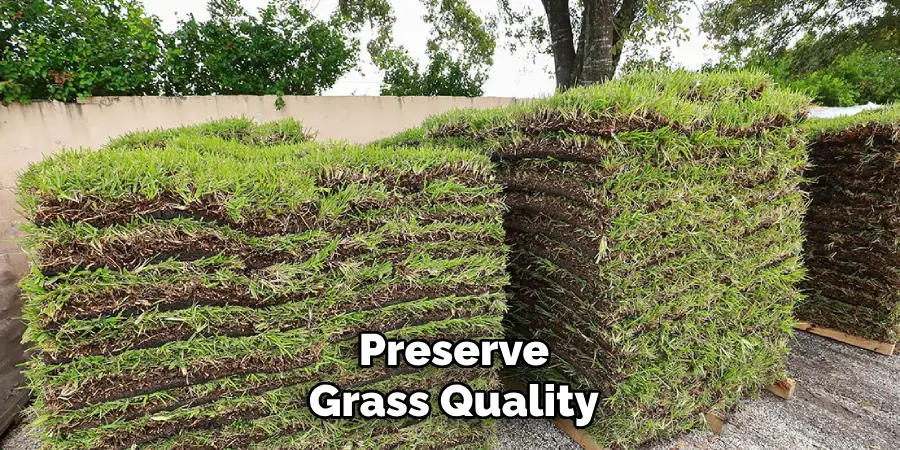
Failing to store sod correctly can have costly consequences. Rolls may become waterlogged or dry out, leading to patchy, yellow lawns or sod that simply fails to root. Poor airflow can trigger mold growth and foul smells, turning your fresh investment into an unusable mess in less than two days. The result is not just an unattractive lawn but also lost time, wasted money, and frustration over avoidable mistakes. By following best practices for storage, you reduce material waste, preserve grass quality, and set yourself up for easy, successful installation.
Preparing to Store Sod
Preparation is pivotal for maintaining sod health during storage. Before you start stacking rolls or slabs, take a few moments to assess the sod’s starting condition and gather the necessary tools.
Assessing Sod’s Condition
Begin by inspecting each roll or slab as soon as it arrives. Look for pre-existing issues such as yellowing patches, excessive dryness, or signs of withering. Squeeze the rolls gently to check moisture; they should feel slightly damp, never dry or soggy. If you detect heat, an off-putting odor, or slime, set affected pieces aside for closer monitoring—these are early signs of decomposition.
Checking for soil firmness will tell you if the sod has been freshly harvested. Crisp, cool sod without dried edges or rotting roots is ideal for storage and later installation.
Gathering Necessary Storage Tools
Successful storage requires a short checklist of practical tools. Secure enough tarps to cover sod stacks and protect them from sun, wind, and excessive rain. Wooden pallets are essential for elevating sod off the ground, helping prevent moisture accumulation and promoting air movement under and around the rolls.
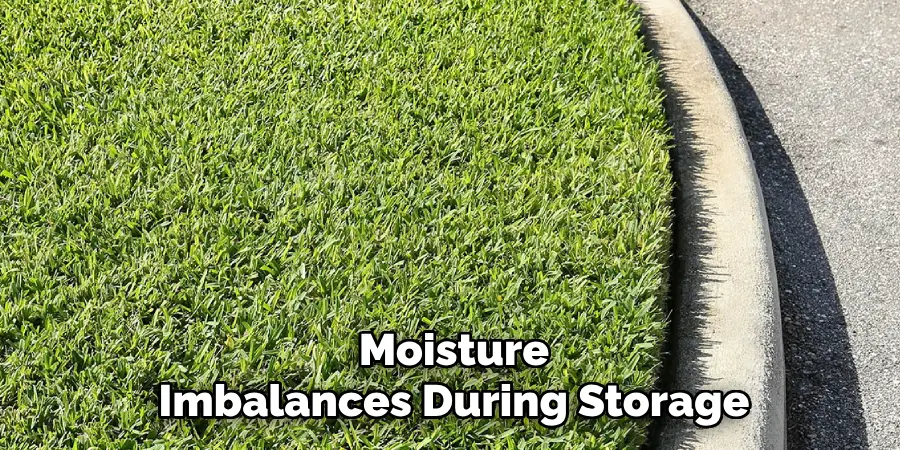
Keep sprinklers or hose attachments handy for gentle misting as needed. If storing sod indoors or in a garage, ensure there’s adequate ventilation—box fans or open windows can help. Lastly, have a rake or pitchfork ready to help with restacking or rearranging sod if you notice any hot spots or moisture imbalances during storage.
How to Store Sod: Guidelines for Storing Sod
Proper sod storage strategies vary based on how long the grass will sit before installation. Understanding both short-term and long-term methods is key to keeping your sod fresh and viable.
Short-Term Storage (Under 24 Hours)
Sod destined for installation within the same day or by the next morning is relatively easy to keep healthy. Begin by selecting a shaded, cool area, away from direct sunlight and wind. Lay out the rolls or slabs on wooden pallets, staggering them so air flows freely between layers. Avoid stacking the rolls higher than three layers to limit heat buildup and pressure on the lower sod.
Lightly mist the sod with water using a nozzle that creates a fine spray. The goal is to prevent the roots from drying out, not to soak the grass. Periodically—at least every few hours—check for dryness or warmth in the center of the stack. If the sod feels warm, gently restack to dissipate heat, or separate the rolls for a while.
Cover the stacks loosely with tarps, allowing some air to circulate at the sides. This prevents sun or wind exposure without trapping heat and humidity. Stored properly, sod can remain viable for up to 24 hours without issue.
Long-Term Storage (24–48 Hours)
If you need to store sod for more than a day, extra care is needed to prevent deterioration. Continue using pallets and keep stacks no more than two layers high. Mist the grass as required to maintain even, moderate moisture, but never allow water to pool at the base.
Ventilation is critical; consider placing portable fans to facilitate airflow if you can’t store the sod outdoors. If outdoor temperatures rise, take special care to shield the sod from direct sunlight, using double layers of tarps during midday but removing them once the heat drops.
Rotate the sod rolls every 8–12 hours to allow all sides to breathe and ensure no area remains pressed for too long. If you detect hot spots or excess moisture, pull apart affected rolls and spread them out to cool down and dry slightly before restacking.
After 48 hours, sod will begin to decline no matter how well you store it, so plan installation as soon as possible.

Common Mistakes to Avoid in Sod Storage
Mistakes during sod storage can undo all your efforts in just hours. Overwatering is one of the most frequent issues; soaking sod causes roots to rot and mold to flourish. Always aim for gentle misting instead of drenching.
Leaving sod exposed to direct sunlight accelerates drying and can irreparably damage the delicate root systems. Be vigilant about finding and creating adequate shade, even if it means shifting the stacks as the sun moves.
Failing to provide ventilation is another frequent oversight. Tightly wrapped stacks or tarps that seal in heat and humidity cause the sod to spoil rapidly. A similar mistake is stacking sod rolls too high, increasing pressure and heat in the lower layers, which speeds decomposition.
Finally, storing sod directly on soil or concrete prevents moisture control and airflow, leading to faster spoilage at the bottom of the stack. Always elevate sod using pallets for best results.
Recognizing Signs of Improperly Stored Sod
Being able to identify early warning signs of sod deterioration enables timely interventions and, sometimes, salvage.
Physical Indicators
Visually examine sod for yellowing grass blades, which indicate dehydration or excessive heat. Mold patches—appearing as fuzzy white, green, or black areas—signal trapped moisture and lack of ventilation. A brittle, dry texture reflects insufficient misting or storage in too much sun; limp, slimy sod suggests excessive water and poor airflow.
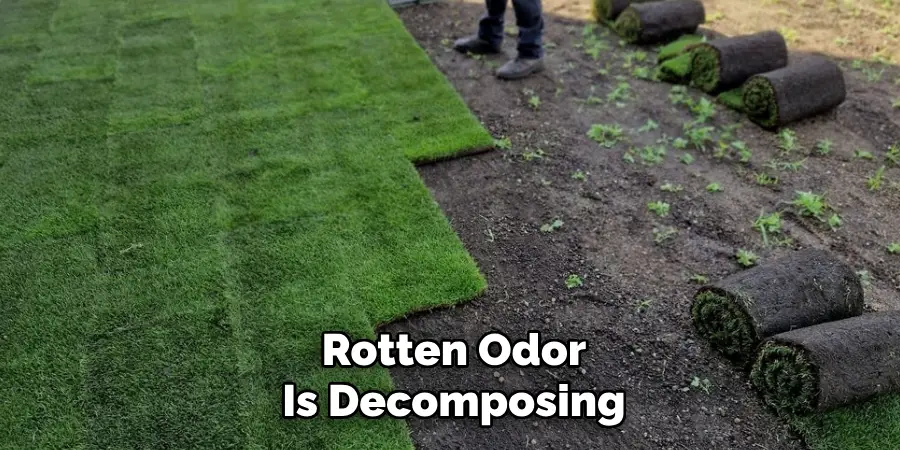
Odor and Texture Clues
Sod that starts to emit a sour or rotten odor is decomposing and should be used immediately if possible or replaced. Rolls with uneven texture—mushy or powdery root mats—are on the verge of being unsalvageable. Regular checking for these signs helps you act before the entire batch turns useless.
Reviving Compromised Sod
If you encounter partially deteriorated sod, prompt steps can sometimes restore its usability. First, separate healthy rolls from damaged ones. Trim away any slimy, discolored, or obviously moldy edges with garden shears. For sod that has dried out, unravel the rolls and lightly soak them on a shaded, well-draining surface for an hour or two—but never let them sit in standing water.
Once rehydrated and cleaned, return the sod to a single-layer arrangement in the shade and allow it to breathe and recover. Resume gentle misting and install salvaged pieces as soon as possible. Keep in mind that severely damaged sod may not root well or might introduce diseases to your lawn, so use recovered material sparingly and only where stakes are low.
Pre-Installation Preparations After Storage
Successfully stored sod still requires careful preparation to ensure optimal performance at installation.
Rehydrating Sod
Before placing the sod on your prepared soil, give each roll or slab a thorough watering so the entire root mat is moist but not soaking. Laying dry sod risks shock and slows down root establishment. Wet the soil where the sod will be installed as well, creating a welcoming, receptive bed for new roots.
Soil Preparation Tips
In addition to watering, prepare the soil surface by loosening it and removing any remaining debris. Apply a starter fertilizer (based on soil test recommendations) to promote immediate root growth and rapid adjustment. This step ensures the stored sod integrates quickly and grows uniformly for a seamless, beautiful lawn.
Benefits of Proper Sod Storage
Mastering how to store sod brings multiple rewards:
- Material Savings: Avoid the cost and hassle of replacing spoiled sod by keeping it healthy until use.
- Simplified Installation: Well-maintained sod is easier to lay, align, and shape for custom areas.
- Vibrant Lawn Establishment: Fresh, viable sod roots faster and grows more evenly, leading to a lush, green lawn from day one.
- Reduced Environmental Impact: Minimizing waste benefits both your wallet and the environment by cutting down on landfill and resource use.
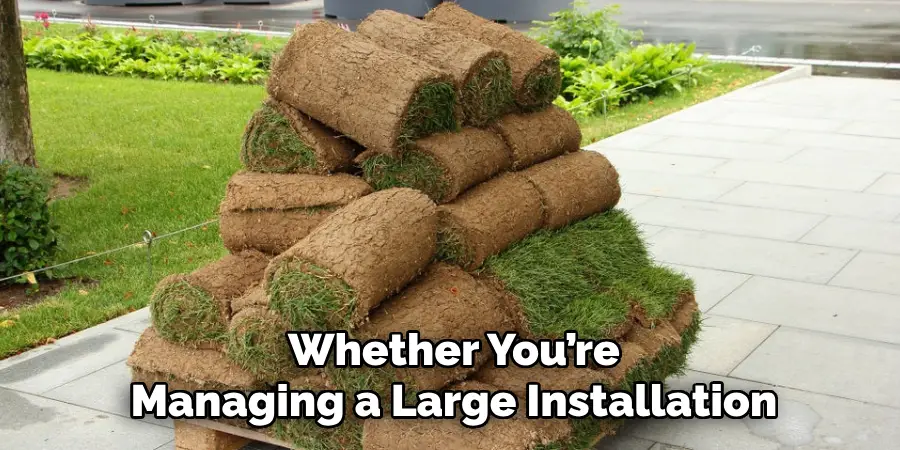
Whether you’re managing a large installation or just working on a small patch of grass, proper storage strategies pay off for both budget and results.
Conclusion
Knowing how to store sod can mean the difference between a thriving, picture-perfect lawn and a patchy, failed installation. By carefully inspecting fresh sod, using proper tools for storage, providing shade, moisture, and ventilation, you safeguard your investment against spoilage. Avoiding the most common pitfalls—overwatering, sun exposure, and poor airflow—ensures sod remains vibrant and ready for easy, successful installation.
Remember to rehydrate and prepare the soil before laying stored sod for best rooting results. Embracing these practices for “how to store sod” preserves your hard work and secures a green, healthy lawn for years to come. Follow these steps each time, and you’ll always be prepared to handle delays or unexpected changes without risking the beauty or health of your new grass.
About
Outdoor Fixes is a distinguished figure in the world of Diy design, with a decade of expertise creating innovative and sustainable Diy solutions.
His professional focus lies in merging traditional craftsmanship with modern manufacturing techniques,
fostering designs that are both practical and environmentally conscious. As the author of diy,
outdoorfixes delves into the art and science of outdoorfixes-making, inspiring artisans and industry professionals alike.
Education RMIT University
(Melbourne, Australia) Associate Degree in Design (Outdoor Fixes) Focus on sustainable design, industry-driven projects,
and practical craftsmanship. Gained hands-on experience with traditional and digital manufacturing tools, such as CAD and CNC software.
Nottingham Trent University
(United Kingdom) Bachelor’s in outdoorfixes.com and Product Design (Honors) Specialized in product design with a focus on blending creativity with production
techniques. Participated in industry projects, working with companies like John Lewis and Vitsoe to gain real-world insights.
Publications and Impact
In diy, Outdoor Fixes his insights on indoor design processes, materials, and strategies for efficient production.
His writing bridges the gap between artisan knowledge and modern industry needs, making it a must-read for both budding designers and seasoned professionals.