
Pool decks are a great way to liven up any outdoor area, but if you’ve had yours for some time, it can start to look shabby. Don’t worry though- resurfacing your pool deck is not as difficult or expensive as it may sound!
You don’t need any prior experience in home improvement—we’ll show you how easy it is to get the job done and have a brand-new-looking pool deck in no time. Read on how to resurface a pool deck and we will explain the different methods of resurfacing and provide you with useful tips and tricks to guide you along the way.
Needed Materials
Before starting the resurfacing process, make sure you have all the necessary materials. Here are the most common materials needed for a pool deck resurfacing project:
- Concrete Cleaner or Degreaser
- Pressure Washer or Garden Hose With Nozzle Attachment
- Scrub Brush or Power Scrubber
- Crack Repair Filler and Sealant (if Needed)
- Concrete Patching Compound
- Concrete Resurfacer or Overlay Mix
- Concrete Trowel
- Paint Roller and Extension Pole (with 3/8 inch to 1/2-inch nap)
- Paint Tray and Liner
- Slip-resistant Additive (optional)
9 Easy Step-by-step Guidelines on How to Resurface a Pool Deck
Step 1: Clean the Concrete
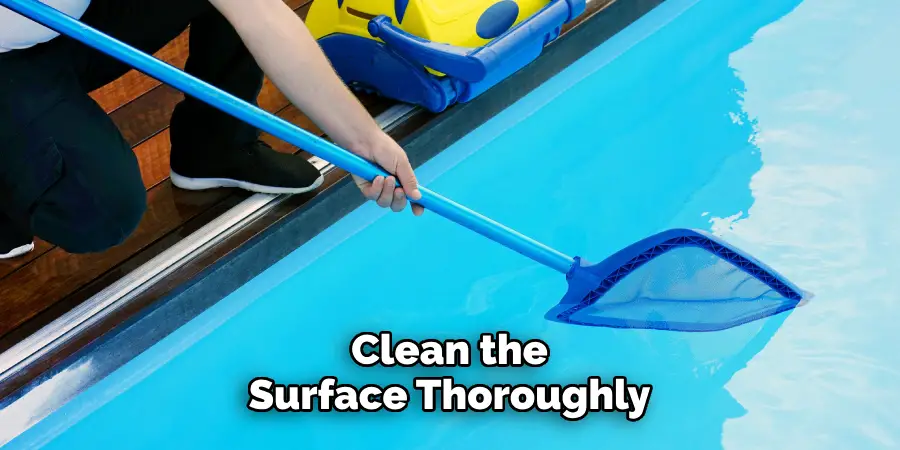
The first step in any resurfacing project is to clean the surface thoroughly. Use a concrete cleaner or degreaser and scrub brush or power scrubber to remove any dirt, stains, or algae from the pool deck. For tougher stains, you may need to use a pressure washer. It is essential to make sure the surface is completely clean and dry before proceeding.
Step 2: Repair Any Cracks
If there are any cracks in your pool deck, it’s important to repair them before resurfacing. Use a crack repair filler and sealant according to the manufacturer’s instructions. Let it cure completely before moving on to the next step. You can also take this time to repair any other minor imperfections on the surface. But don’t worry, you don’t need to fix every small crack or chip – they will add character to your newly resurfaced pool deck.
Step 3: Mix Your Concrete Resurfacer
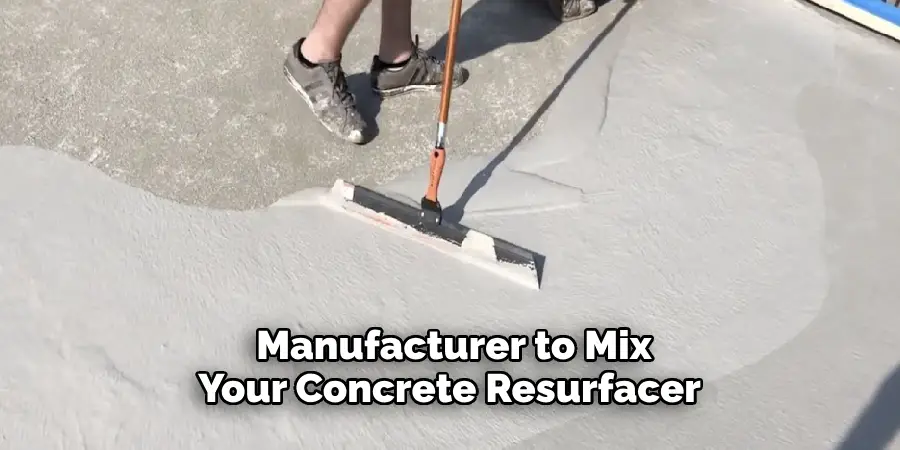
Follow the instructions provided by the manufacturer to mix your concrete resurfacer. Make sure to measure accurately and mix thoroughly to get the best results. Otherwise, you may end up with an uneven surface or color variations. It is also at this stage where you can add the slip-resistant additive to your mix if desired.
Step 4: Wet the Concrete
Before applying the resurfacer, you need to wet the concrete surface. This will prevent the new layer from drying too quickly and cracking. You can use a garden hose with a nozzle attachment or a sprayer. You don’t want to flood the surface, just make sure it’s damp. But remember, don’t apply the resurfacer on wet concrete. It needs to be damp, not soaked.
Step 5: Apply the Resurfacer
Using a concrete trowel, spread the resurfacer evenly across the entire pool deck. Work in small sections, making sure not to apply too thick of a layer. Otherwise, it may not dry properly and could crack. For better coverage, you can use a paint roller and extension pole to roll the resurfacer on the edges and corners. It’s also helpful to have a partner at this stage to help you with the roller and keep an eye out for any missed spots.
Step 6: Texture the Surface
To create a slip-resistant texture, use a broom or a concrete brush to lightly drag it across the surface in long, sweeping motions. You can also use a stamp or stencil if you want to create a particular pattern on your pool deck. It’s important to texture the surface while it’s still wet. By doing so, you’ll avoid any issues with the texture not sticking or the surface being too hard to work on.
Step 7: Cure the Resurfacer
Cover the freshly resurfaced pool deck with plastic sheeting and let it cure for at least 24 hours. During this time, make sure to keep the surface damp by lightly misting it with water a few times throughout the day. This will help the resurfacer cure properly. You should also avoid walking on the surface until it’s fully cured.
Step 8: Seal the Surface
Once the surface is fully cured, you can apply a sealant to protect it from stains and fading. Use an acrylic-based concrete sealer and follow the instructions on how to apply it. You may need to apply multiple coats for optimal protection. It’s also a good idea to add a coat of clear non-slip sealer for added safety. But remember to let the sealant dry completely before using the pool deck.
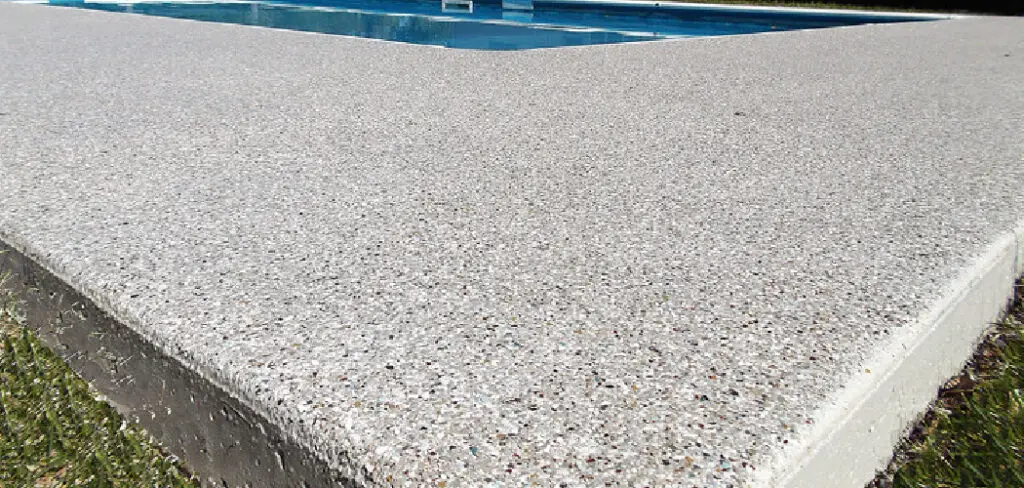
Step 9: Enjoy Your Newly Resurfaced Pool Deck!
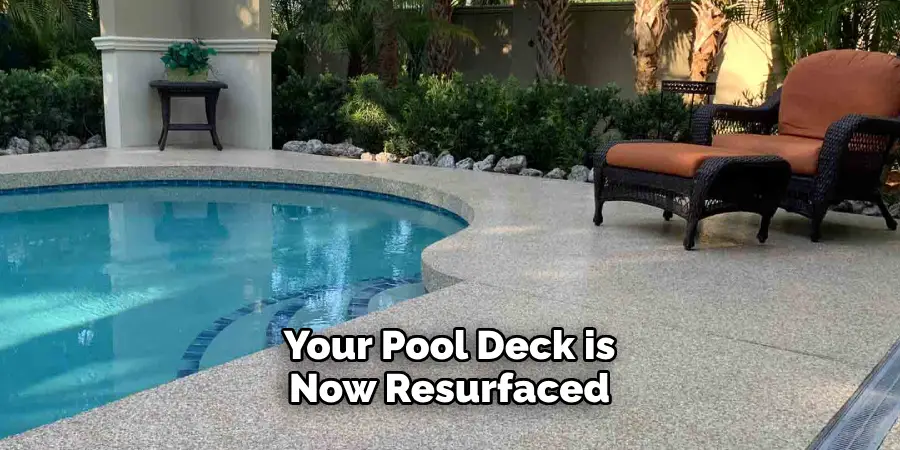
Congratulations! Your pool deck is now resurfaced and ready to be enjoyed. With proper maintenance, your newly resurfaced pool deck can last for many years. Regularly clean the surface and reapply sealant as needed to keep it looking like new.
Always follow the manufacturer’s instructions and safety precautions when using any products for your pool deck. And there you have it – a simple guide on how to resurface a pool deck. Get ready to relax and enjoy your beautiful outdoor space! Happy resurfacing!
Do You Need to Take Help or Professional Service?
If you have a smaller pool deck that needs resurfacing, it’s definitely possible to do it yourself. But for larger pools or more extensive damage, it might be best to hire a professional to ensure the job is done correctly and efficiently. They will also have access to specialized equipment and materials that may not be readily available to homeowners.
It’s always better to seek expert advice if you’re unsure about any part of the resurfacing process. Remember, safety is always a top priority when dealing with concrete surfaces. So, don’t hesitate to ask for help or hire a professional if needed. Your pool deck will thank you!
How Much Does It Cost?
The cost of resurfacing a pool deck can vary depending on factors such as the size of the pool, extent of damage, and location. On average, the cost can range from $3 to $10 per square foot. It’s also essential to consider additional costs for materials and labor if you decide to hire a professional.
It’s best to get quotes from multiple contractors and compare prices to find the best option for your budget. Remember, investing in proper resurfacing can save you money in the long run by preventing further damage and extending the life of your pool deck.
Frequently Asked Questions
Q: Can I Resurface My Pool Deck Myself, or Do I Need to Hire a Professional?
A: With the right tools and materials, you can resurface your pool deck yourself. However, if you’re not confident in your skills or don’t have the time to do it yourself, it’s always best to hire a professional for the job. They have the experience and knowledge to get the best results.
Q: How Long Does a Pool Deck Resurfacing Last?
A: A properly resurfaced pool deck can last anywhere from 8-12 years. However, this also depends on various factors such as the climate, maintenance, and type of materials used.
Q: Can I Change the Color of My Pool Deck When Resurfacing?
A: Yes, you can change the color of your pool deck when resurfacing. There are various colors and patterns available in concrete resurfacers, allowing you to customize your pool deck according to your preference.
Q: Can I Walk on My Pool Deck During the Resurfacing Process?

A: It’s best to avoid walking on the pool deck during the resurfacing process, especially after applying the concrete resurfacer. This will prevent any footprints or uneven spots on the surface.
Conclusion
In conclusion on how to resurface a pool deck, pool deck resurfacing is a huge undertaking that requires research and careful preparation. Take your time in deciding what materials to use, how to do the resurfacing process correctly, and of course, getting the right contractor to do it for you.
Imagine having a whole new pool deck ready for summer parties or just spending an afternoon taking a dip – with the right approach, you can make it happen in no time! So get out there and get started on giving your pool deck an amazing new look. And who knows?
It could be the starting point of many more home improvement projects that will transform your backyard into something extraordinary! Now that you know what it takes to resurface a pool deck, don’t forget to take action and make it happen. Enjoy a shiny new outdoor experience this summer – happy resurfacing!
Can I Resurface My Pool Deck Myself, or Do I Need to Hire a Professional?
About
Outdoor Fixes is a distinguished figure in the world of Diy design, with a decade of expertise creating innovative and sustainable Diy solutions.
His professional focus lies in merging traditional craftsmanship with modern manufacturing techniques,
fostering designs that are both practical and environmentally conscious. As the author of diy,
outdoorfixes delves into the art and science of outdoorfixes-making, inspiring artisans and industry professionals alike.
Education RMIT University
(Melbourne, Australia) Associate Degree in Design (Outdoor Fixes) Focus on sustainable design, industry-driven projects,
and practical craftsmanship. Gained hands-on experience with traditional and digital manufacturing tools, such as CAD and CNC software.
Nottingham Trent University
(United Kingdom) Bachelor’s in outdoorfixes.com and Product Design (Honors) Specialized in product design with a focus on blending creativity with production
techniques. Participated in industry projects, working with companies like John Lewis and Vitsoe to gain real-world insights.
Publications and Impact
In diy, Outdoor Fixes his insights on indoor design processes, materials, and strategies for efficient production.
His writing bridges the gap between artisan knowledge and modern industry needs, making it a must-read for both budding designers and seasoned professionals.