
Building a waterproof shelter can be intimidating for even the most experienced outdoorsman – it’s a huge undertaking, and getting it wrong could leave you without protection during an unexpected downpour. But with the right knowledge, materials, and tools, constructing a reliable shelter doesn’t have to feel overwhelming.
In this blog post, we’ll go over all the steps on how to build a waterproof shelter necessary for building an effective waterproof shelter that will keep you safe in wet weather.
We’ll cover topics such as what tools to use, how to choose a location, and material types best suited for ensuring maximum protection from the elements. So sharpen up those hammers (or invest in some if needed) because, by the end of this guide, you’ll be ready to build your very own secure waterproof sanctuary!
Why Building a Waterproof Shelter
1. To Keep Dry
Building a waterproof shelter is essential for any campers or hikers who plan on spending extended periods of time outdoors. It isn’t just about having something to keep you dry when it rains either – shelter can also provide protection from strong winds, extreme temperatures, and other environmental hazards. So it’s important to make sure that your shelter is built with “waterproof” in mind.
2. To Stay Warm
A waterproof shelter is also beneficial for keeping you warm and comfortable on cold nights. When your shelter has properly sealed walls, it traps your body heat inside and keeps moisture out. This basically allows you to create a pocket of warmth so that you can get some restful sleep despite the low temperatures outside.

What Materials Do You Need
Building a waterproof shelter requires some durable materials that are strong enough to withstand heavy rain and winds while also keeping you dry inside.
- Tarps- This is a must-have for covering the roof and walls of your shelter. Use two tarps – one on top to protect from rain and another underneath to catch any water that may seep through.
- Polyethylene Sheeting- You’ll want to use polyethylene sheeting for the floor of your shelter as it’s designed to repel water and keep you dry.
- Nails or Staples- Make sure to have either nails or staples on hand, depending on the type of tarp you use. This is necessary for attaching the tarps to the walls and roof frame of your shelter.
- Wood– You’ll need wood pieces that are long enough to cover the area of your shelter. These should be large enough to support the tarps for a waterproof seal.
Choosing a Location
When it comes to building a waterproof shelter, location is key! Choose an area with plenty of trees that’s not too close to running water – this will prevent any flooding in case of heavy rain. Also, look for ground that’s not too steep, as this could cause the shelter to collapse in strong winds.

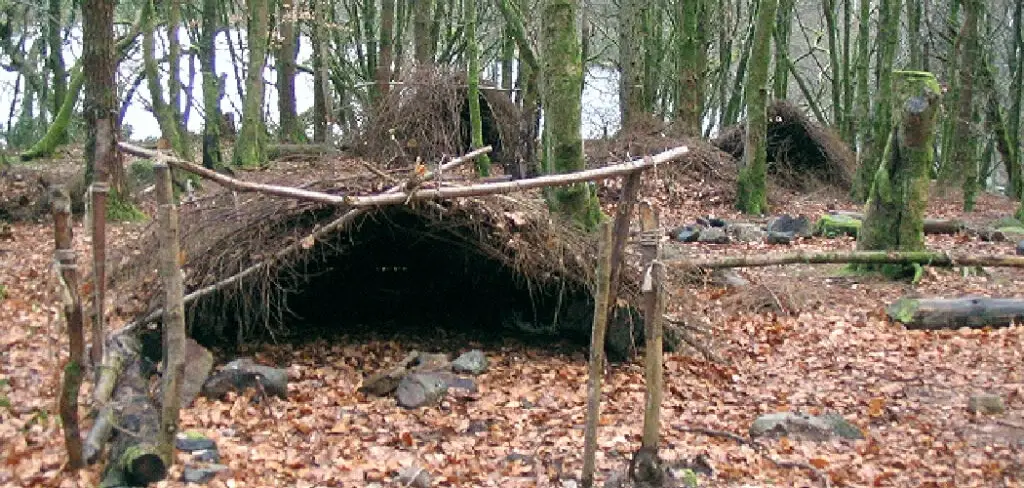
How to Build a Waterproof Shelter in 10 Ways
1. Lay Out
Start by laying out the tarp on the ground and use it to trace a rectangular shape for your shelter. Also, make sure to leave enough space around the perimeter for the roof.
2. Add the Frame
Using your wood pieces, assemble a frame that is similar in shape and size to your tarp outline. Make sure each piece is securely attached with nails or staples.
3. Cover Roof Frame
Lay one tarp on top of the roof frame, then use nails or staples to attach it securely. Also, make sure to leave a few inches of extra tarp hanging over the edges.
4. Attach Walls
Now, it’s time to attach the walls of your shelter. First, cut out pieces from the second tarp that are large enough to cover each wall section. Then, use nails or staples to secure them in place on your frame.
5. Add Flooring
To protect the ground from water, lay down a sheet of polyethylene sheeting for your floor. Use nails or staples to attach it firmly to the bottom of the frame. Also, make sure to overlap the edges of the sheeting to create a waterproof seal.

6. Secure Doors and Windows
If you want your shelter to have doors or windows, now is the time to add them! Cut out sections from the tarp and use nails or staples to attach it securely in place. Make sure that these are also properly sealed with overlapping edges of the tarp.
7. Add Rain Fly
To give your shelter additional protection from rain and wind, use a third tarp to create a rainfly. This should be large enough to cover the roof of your shelter but still leave some space around its perimeter for ventilation. Also, make sure that it’s securely attached using nails or staples.
8. Secure the Edges
Once your rain fly is in place, use nails or staples to secure the edges of all three tarps – the two on the roof and walls and one on top for the rain fly. This way, you’ll ensure that your shelter is completely sealed from water and wind.
9. Add Finishing Touches
To make your shelter both comfortable and functional, you can add some finishing touches, such as a door flap, window covers, or interior pockets for storage. These are all great additions that will make your shelter more enjoyable to use in the rain.
10. Enjoy Your Shelter!
And there you have it – your very own waterproof shelter! Now you can enjoy some peace and quiet during a rainstorm, stay dry while camping or hiking in wet weather, and take refuge during an unexpected downpour. So the next time you’re out in the wild, make sure to build yourself a reliable waterproof sanctuary with these steps.
With the right knowledge and materials, building a waterproof shelter is easy and will give you confidence when adventuring into the great outdoors. Be sure to choose a sheltered spot with plenty of trees, use durable tarps and sheeting for protection, and take the time to secure all edges of your shelter for maximum safety.

8 Common Mistakes to Avoid When Building a Waterproof Shelter
When building a waterproof shelter, it’s important to plan ahead and think about potential problems you may encounter. To make sure your structure holds up in wet weather, avoid making these eight common mistakes:
- Not taking into account the climate. Before starting construction, check the area’s historical rainfall data to get an idea of how much water your shelter will need to withstand. If the area is prone to heavy downpours or flooding, you may want to make sure your structure has extra reinforcement in certain areas.
- Not using proper materials. Make sure you use waterproof materials such as treated lumber, vinyl siding, and waterproof sealants when building your shelter. If possible, use materials that won’t be affected by water damage over time.
- Not using enough seaming and sealing. Seams and seals are an essential part of waterproofing your shelter. Make sure all the joints in your structure are completely sealed with caulk or other sealants to prevent water from getting into your shelter.
- Ignoring the foundation. A strong foundation is essential for a waterproof shelter, so make sure that all of the footing and base materials are completely dry and free of any cracks before beginning construction.
- Not taking into account where water will flow. Make sure you take into consideration where rainwater will run off your structure when planning out your design. It’s important to direct water away from your shelter, not towards it.
- Not insulating the roof correctly. Make sure you install insulation properly so that moisture won’t be able to get inside and cause damage or rot.
- Neglecting the windows and doors. To keep your structure waterproof, make sure to use waterproof materials when installing windows and doors.
- Failing to consider ventilation. Make sure to install a vent system for your shelter if possible, which will help reduce the likelihood of condensation building up inside.
By following these simple tips on how to build a waterproof shelter, you can ensure that your waterproof shelter will hold up against even the harshest elements! With proper planning and construction, you’ll have a sturdy, reliable shelter to protect you for years to come.

8 Maintenance Tips
Now that you have your waterproof shelter built, it’s time to think about maintenance. Here are eight tips for keeping your shelter in top shape:
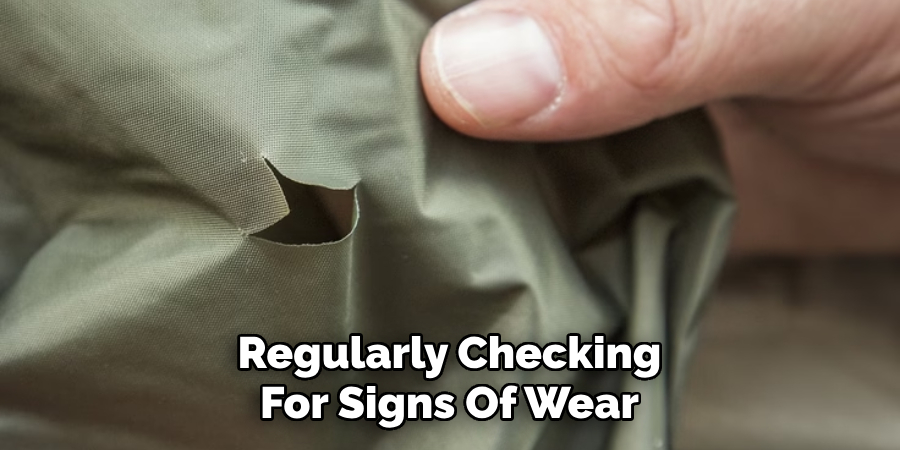
- Inspect your structure regularly for signs of wear and tear, such as peeling paint or broken clamps. If there are any noticeable issues, address them right away to avoid further damage.
- Clean your shelter regularly to remove dirt and debris that can accumulate over time. Make sure to use a non-abrasive cleaning solution so you don’t damage the waterproof coating.
- Replace any seals or gaskets that are cracked, missing, or worn out. This will help keep your shelter secure during extreme weather conditions.
- Apply a fresh coat of paint to the outside of your shelter every two years or if you notice any peeling or flaking.
- Check the roof regularly for signs of wear, such as cracked tiles or loose nails. Make sure to replace any broken tiles and re-secure all nails so that your roof is secure against the elements.
- Make sure that the windows and doors are sealed properly to prevent water from leaking inside. If there are any cracks or gaps, seal them using a waterproof caulk or sealant.
- Keep your shelter in good condition by regularly checking for signs of wear, replacing worn-out seals, and cleaning it regularly.
- Maintain the interior of your shelter by cleaning surfaces and replacing any furniture or fixtures that are damaged.
By following these tips on how to build a waterproof shelter, you can ensure that your waterproof shelter will provide a safe haven in the worst of weather conditions. With regular maintenance, your waterproof shelter will be able to stand up to years of wear and tear with ease.
Frequently Asked Questions
How Much Will It Cost?
The cost of building a waterproof shelter depends on the size and materials you use. Generally speaking, expect to spend anywhere from $500-$1,000 for materials alone. Of course, if you hire a professional or purchase a pre-made one, then the cost could be higher.
How Long Will It Last?
The longevity of your waterproof shelter depends on the materials used and the upkeep. Generally speaking, if you use quality materials and maintain it properly, then you can expect it to last for many years. Also, keep in mind that different materials offer varying levels of waterproof protection, so be sure to research the best option for you and your environment.
How Often Do You Need to Repair It?
Repairing a waterproof shelter should be done on an as-needed basis. Depending on the climate and materials used, repairs may need to be done more frequently in some areas than others. Make sure you inspect your shelter regularly for signs of wear and tear so you can repair any issues before they become bigger problems.
Conclusion
In summary, building a waterproof shelter involves finding the right materials, creating sturdy frames and walls, adding tarpaulin for additional protection, and reinforcing the shelter with sandbags. Not only will this structure be resistant to water, but it will also be windproof and safe from harsh storms.
Overall, building a waterproof shelter is an achievable task with proper planning and execution of the aforementioned techniques.
Furthermore, constructing a waterproof shelter can help protect you from a variety of weather elements and other challenging conditions. So, if you’re looking for a more permanent solution in terms of shelter, don’t hesitate to start building this must-have!
Just follow these steps on how to build a waterproof shelter properly, and you’ll be sure to have your own waterproof shelter in no time. With the correct structure in place, you’ll have the peace of mind that comes with knowing your outdoor abode is equipped to handle whatever Mother Nature throws your way.
About
Outdoor Fixes is a distinguished figure in the world of Diy design, with a decade of expertise creating innovative and sustainable Diy solutions.
His professional focus lies in merging traditional craftsmanship with modern manufacturing techniques,
fostering designs that are both practical and environmentally conscious. As the author of diy,
outdoorfixes delves into the art and science of outdoorfixes-making, inspiring artisans and industry professionals alike.
Education RMIT University
(Melbourne, Australia) Associate Degree in Design (Outdoor Fixes) Focus on sustainable design, industry-driven projects,
and practical craftsmanship. Gained hands-on experience with traditional and digital manufacturing tools, such as CAD and CNC software.
Nottingham Trent University
(United Kingdom) Bachelor’s in outdoorfixes.com and Product Design (Honors) Specialized in product design with a focus on blending creativity with production
techniques. Participated in industry projects, working with companies like John Lewis and Vitsoe to gain real-world insights.
Publications and Impact
In diy, Outdoor Fixes his insights on indoor design processes, materials, and strategies for efficient production.
His writing bridges the gap between artisan knowledge and modern industry needs, making it a must-read for both budding designers and seasoned professionals.