
Keeping your pool water crystal clear and inviting is the ultimate goal for any pool owner, but it often feels like a constant battle against floating leaves, bugs, and debris. If you are relying solely on a handheld net or a basic pump intake, you are likely working harder than necessary. A surface skimmer is the unsung hero of pool maintenance, automating the cleaning process and ensuring your pump runs efficiently.
For many above-ground pool owners, the idea of cutting a hole in the side of their pool liner is terrifying. It feels permanent and risky. What if you cut in the wrong spot? What if it leaks? These fears are common, but the reality is much less daunting. With the right tools, a steady hand, and a clear plan, installing a thru-wall skimmer is a manageable DIY project that can be completed in an afternoon.
This guide will walk you through exactly how to install a skimmer in above ground pool setups. We will cover everything from the necessary tools to the precise cutting technique, ensuring you have the confidence to upgrade your pool and enjoy cleaner water with less manual effort.
Understanding the Importance of a Skimmer Upgrade
Circulation and Filtration Benefits
A pool skimmer does more than just catch leaves; it is a critical component of your pool’s circulation system. By drawing water from the surface—where the majority of contaminants live—it allows your pump to filter out oils, sunscreen, pollen, and debris before they have a chance to become waterlogged and sink to the bottom.
Without a skimmer, this surface layer often sits stagnant, becoming a breeding ground for algae and bacteria. An installed skimmer creates a continuous draw that pulls this top layer of water into the filtration system. This constant movement increases your water turnover rate, meaning your entire pool volume is filtered more effectively. The result is water that sparkles and requires less manual vacuuming.
Chemical Distribution Efficiency
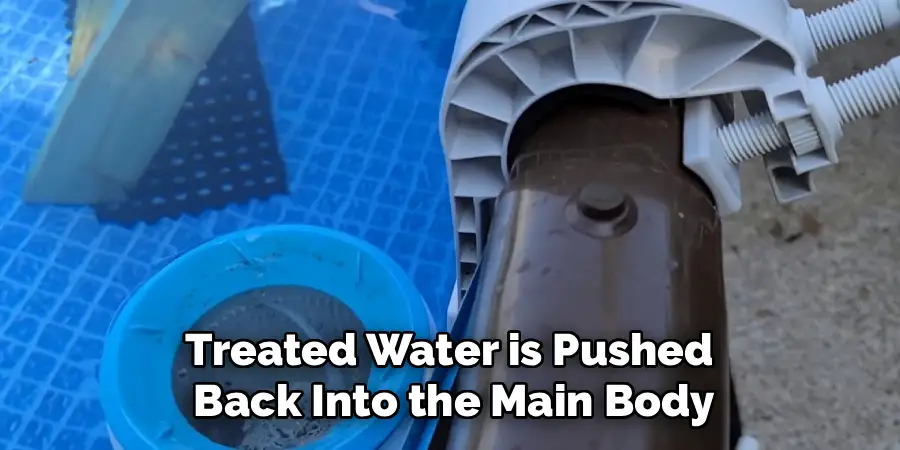
Beyond cleaning, skimmers play a vital role in sanitation. When you add chlorine tablets or sticks to a skimmer basket, the water rushing over them dissolves the sanitizer and disperses it evenly throughout the pool via the return jet. This is often more effective than using a floating dispenser, which can sometimes get stuck in one corner or release chemicals too slowly.
By centralizing the intake of water, the skimmer ensures that the chemically treated water is pushed back into the main body of the pool, preventing “dead spots” where algae can bloom. This efficient distribution helps maintain consistent chemical levels, saving you money on shock treatments and clarifiers in the long run.
Essential Tools and Materials Checklist
Required Tools for the Job
Before you begin cutting into your pool wall, you need to gather the right tools. Being prepared prevents panic midway through the installation. You will need a cordless drill with suitable bits for the mounting screws. A standard Phillips head screwdriver is essential for the final tightening, as power drills can sometimes over-tighten and crack plastic components.
A high-quality utility knife or box cutter with a fresh, sharp blade is non-negotiable. You will be cutting through tough vinyl, and a dull blade can slip or tear the material. Additionally, have a permanent marker or a grease pencil on hand to trace your templates directly onto the pool wall. A towel or rag is also helpful for wiping down surfaces before applying gaskets.
Materials and Hardware
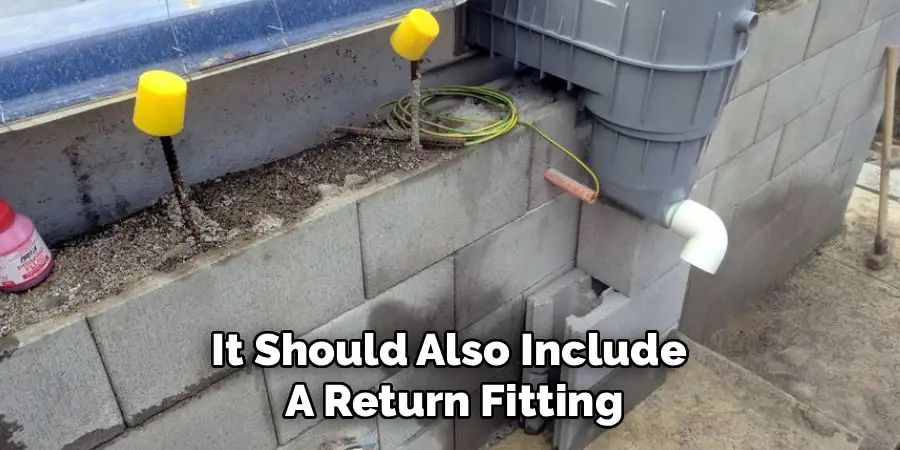
Your new skimmer typically comes as a kit. This kit should include the main skimmer housing (the body), a faceplate (the rectangular frame that goes inside the pool), a rubber butterfly gasket (or two separate gaskets), a weir door (the flapper), a basket, and a lid. It should also include a return fitting assembly for the water going back into the pool.
Check your kit immediately to ensure you have all the stainless steel screws required. It is also wise to have a small roll of Teflon tape for sealing the threaded plumbing connections. Some installers prefer to use a small amount of 100% silicone sealant around the gasket for extra peace of mind, although a properly installed butterfly gasket usually does not require it.
Preparing Your Pool for Installation
Lowering the Water Level
You cannot install a through-wall skimmer with the water level sitting at the installation height. You must drain the pool water to a safe working level. Aim to lower the water level to about three to four inches below where the bottom of the skimmer opening will be. This prevents water from rushing out while you are drilling and cutting, keeping your workspace dry and manageable.
Do not drain the pool completely. You need the weight of the water to keep the liner stretched tight and in position. If you drain too much, the liner might shrink or shift, causing wrinkles or misalignment when you refill it. Working with a partially filled pool ensures the liner stays exactly where it needs to be.
Smoothing the Liner and Wall
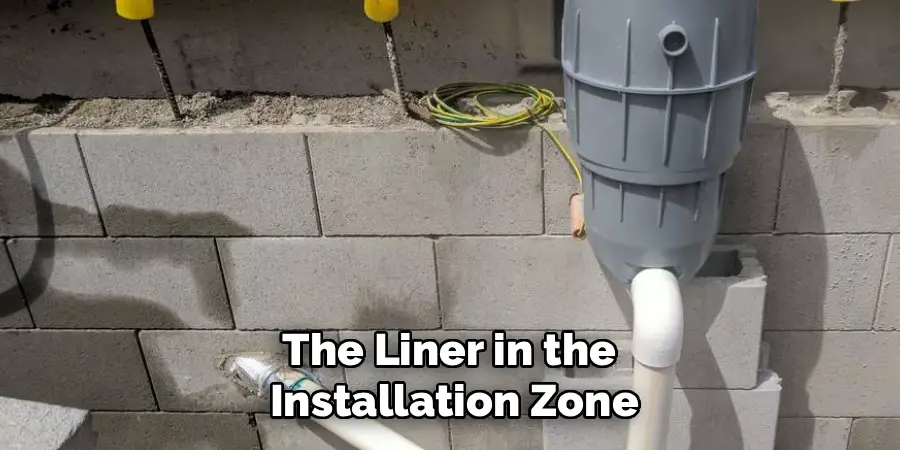
Once the water is lowered, inspect the area where you plan to install the skimmer. The pool wall should be sturdy and free of significant rust or corrosion. If you are retrofitting an older pool, you might need to sand down rust spots and apply a rust-inhibitor paint before proceeding.
Crucially, check the liner on the inside of the pool. It must be smooth and flush against the wall. Any wrinkles or folds in the liner behind the faceplate can compromise the seal and lead to leaks. Use your hands to smooth out the liner in the installation zone, ensuring there is no air gap between the vinyl and the metal wall.
Step-by-Step Guide on How to Install a Skimmer in Above Ground Pool
Step 1: Determine the Ideal Location
Choosing the right spot is strategic. Ideally, you want to place the skimmer downwind from the prevailing breeze. The wind will naturally push surface debris toward the skimmer, helping it work more efficiently. If your pool already has a cutout in the metal wall from the factory, your location choice is made for you. If you are cutting a new hole in a solid wall, look for a panel that is easily accessible for maintenance and close to your pump and filter system to minimize hose length.
Step 2: Mark the Template on the Wall
Most skimmer kits come with a cardboard or paper template. Tape this template securely to the outside of the pool wall at your chosen location. Ensure it is level; a crooked skimmer will look unprofessional and may not function optimally. Using your marker, trace the inside square (the opening) and mark every single screw hole clearly on the metal wall. If your pool already has a factory knockout panel, you may still need to use the faceplate itself to mark new screw holes if they don’t align perfectly.
Step 3: Drill the Screw Holes
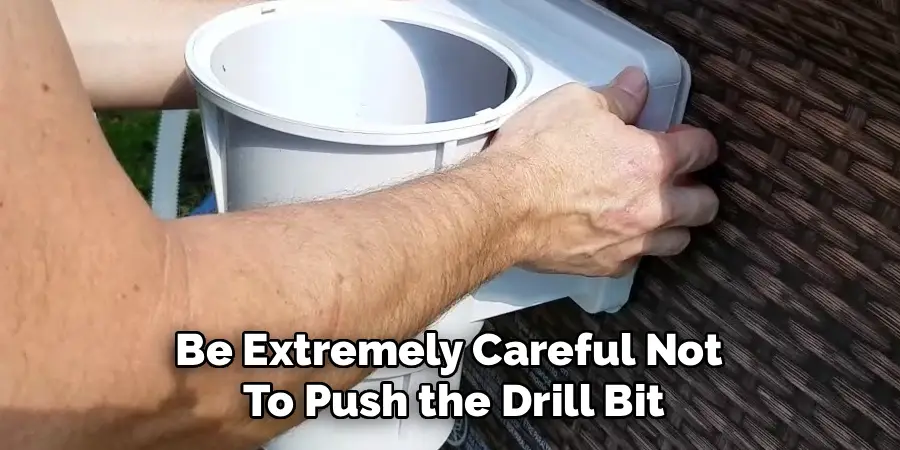
Before you cut the large square opening for the skimmer, you must drill the screw holes. Use a drill bit that is slightly smaller than the screws provided to ensure a tight bite. Drill from the outside in. Be extremely careful not to push the drill bit through far enough to puncture the liner on the other side. You can wrap a piece of tape around your drill bit as a depth stop to prevent accidents. Once the holes are drilled, gently sand away any sharp metal burrs that could damage the gasket or liner.
Step 4: Install the Butterfly Gasket and Faceplate
This is the most critical step for leak prevention. A butterfly gasket is a single piece of rubber that folds over the raw metal edge of the pool wall, sealing both the inside and outside. If your kit has two separate flat gaskets, one goes on the outside of the wall (between the wall and skimmer body) and one goes on the inside (between the liner and faceplate).
For a butterfly gasket, carefully insert it into the factory cutout or the new hole you will cut (note: if you haven’t cut the large hole yet, you will be installing flat gaskets).
Standard Method (Pro Tip): To ensure perfect alignment, many experts recommend not cutting the large hole in the liner yet. Instead, position the skimmer body on the outside of the pool and the faceplate on the inside. Push a screw through the top corner of the faceplate, through the liner, through the wall, and into the skimmer body. This “sandwiches” the liner and wall together. Repeat this for all corners to hold everything in place.
Step 5: Secure the Skimmer Body
With the faceplate and skimmer body aligned and held loosely by the corner screws, proceed to insert the remaining screws. You want to tighten these screws firmly to compress the gasket, but be careful not to crack the plastic faceplate. A hand screwdriver is best for the final turns. Work in a star pattern (top left, bottom right, top right, bottom left) to ensure even pressure across the entire sealing surface.
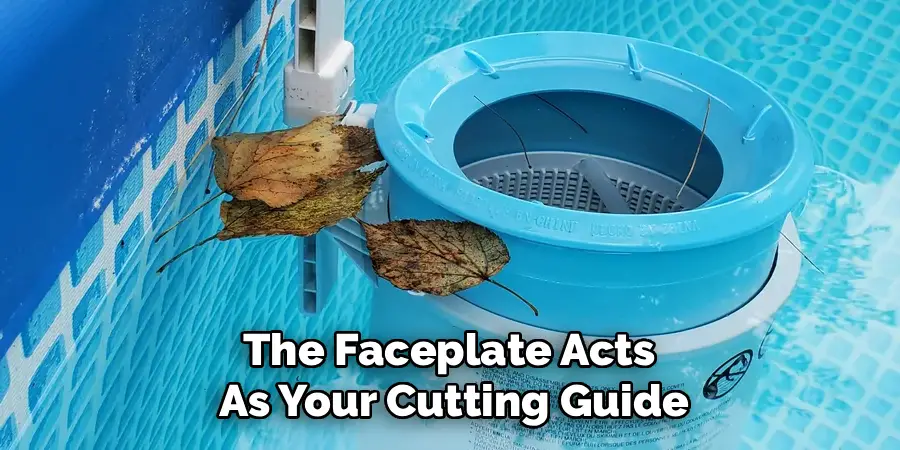
Step 6: Cut the Liner Material
Only after the faceplate is completely screwed in and tight should you cut the liner. The faceplate acts as your cutting guide. From inside the pool, use your utility knife to carefully trace the inside edge of the faceplate frame. Remove the square of vinyl liner. Because the faceplate is already securing the liner to the wall, the remaining vinyl will not slip or wrinkle. This method creates the perfect opening and ensures the seal is already established before the cut is made.
Connecting the Plumbing and Return Jet
Setting Up the Return Fitting
Your installation likely includes a new return jet (where the water shoots back into the pool). This is usually installed on the opposite side of the pool or a few feet away from the skimmer to promote circulation. The process is similar: mark the location, cut a circular hole (if one doesn’t exist), and install the fitting.
The return fitting consists of a threaded body that goes through the wall, a gasket, and a locking nut. Ensure the gasket is on the inside of the pool (some kits have gaskets for both sides). Tighten the nut securely on the outside. Apply Teflon tape to the threads of the directional eyeball fitting before screwing it into the return assembly inside the pool.
Attaching Hoses and Clamps
With the hardware mounted, it is time to connect the plumbing. Connect a pool hose from the bottom of the skimmer housing to the intake (suction) side of your pool pump. Use a hose clamp to secure it tightly. Next, connect a hose from the output of your filter system to the new return fitting you just installed.
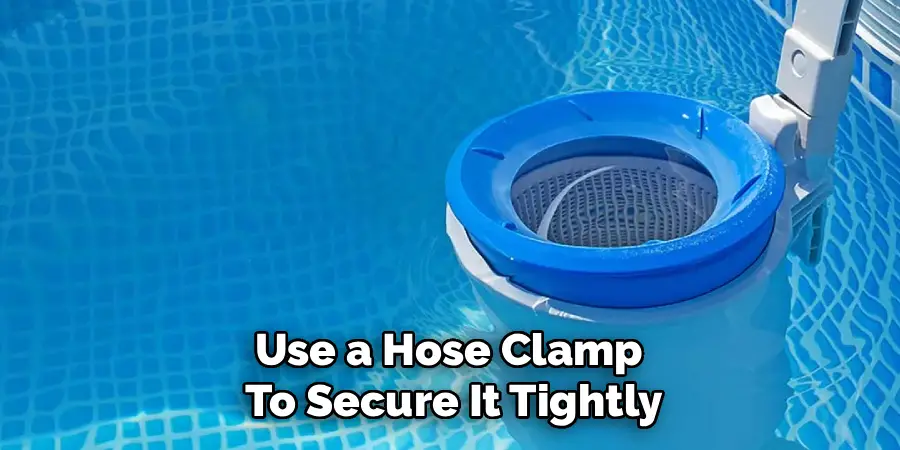
Double-check that your hoses are not kinked and that the clamps are positioned over the ribbed section of the fittings for maximum grip. If you are using hard PVC plumbing instead of flexible hoses, dry fit all your connections first before gluing them with PVC primer and cement.
Testing the Installation for Leaks
Refilling the Pool
With everything tightened and connected, you can begin refilling the pool. Do not walk away during this process. Watch the water level rise. As it reaches the bottom of the skimmer faceplate, slow down the flow or stop to inspect for immediate leaks.
Look closely at the bottom edge of the skimmer on the outside of the pool wall. This is the most common spot for drips. Also, check the connection where the hose meets the bottom of the skimmer canister. If the area remains dry, continue filling until the water level reaches the halfway point of the skimmer opening.
Identifying and Fixing Drips
If you spot a drip coming from around the faceplate screws or the skimmer body, do not panic. Often, this just means the screws need another quarter-turn of tightening. The gasket may need a little more compression to seal against the ridges of the corrugated pool wall.
If water is dripping from the hose connection, check that the hose clamp is tight and positioned correctly. If the leak persists, you may need to add more Teflon tape to the threads of the hose adapter fitting. In rare cases where a faceplate leak won’t stop, you may need to lower the water, remove the faceplate, and inspect the gasket for debris or defects.
Long-Term Maintenance and Care
Routine Basket Cleaning
Your new skimmer is now the primary defense against debris. This means the internal basket will fill up quickly, especially during autumn or after storms. Check the basket daily. A clogged skimmer basket restricts water flow to the pump, which can cause the pump to overheat or run dry. Simply remove the lid, pull out the basket, dump the debris, and rinse it out.
Consider using a “skimmer sock”—a fine mesh fabric that goes over the basket. It catches ultra-fine particles like pollen and dog hair that would otherwise pass through to your filter, extending the life of your filter cartridge or sand.
Winterizing the Skimmer
If you live in an area with freezing temperatures, protecting your skimmer in winter is crucial. Water expands when it freezes, and if water is left inside the skimmer body, it can crack the plastic housing.
To winterize, drain the water level below the skimmer opening. Alternatively, you can install a faceplate cover (often called a skimmer plug or Aquador) that snaps onto the faceplate, creating a watertight seal. This allows you to keep the water level high while draining the skimmer itself. Disconnect the hoses from the bottom of the skimmer to ensure no water is trapped in the lines.

Common Installation Mistakes to Avoid
Rushing the Cutting Process
The biggest mistake DIYers make is cutting the liner too early. Once you cut that vinyl, there is no going back. If you cut the hole before the faceplate is securely screwed on, the liner can shift, stretch, or tear, leaving you with a gap that the gasket cannot cover. Always install the faceplate completely before bringing the knife to the vinyl.
Overtightening Hardware
While you want a tight seal, brute force can be destructive. Pool skimmers and faceplates are made of plastic. If you use a high-torque drill setting or lean into the screwdriver too hard, you can crack the faceplate around the screw holes. A crack compromises the pressure on the gasket and will inevitably lead to a leak. Tighten until snug and the gasket is slightly compressed, but stop before you hear the plastic creak or deform.
Conclusion
Upgrading your filtration system is one of the best investments you can make for your swimming experience. By learning how to install a skimmer in above ground pool setups, you have taken a massive step toward easier maintenance and clearer water. The process, while requiring precision and patience, is well within the reach of a handy pool owner.
With your new skimmer humming along, you will notice fewer bugs floating on the surface, better chemical circulation, and a pump that runs more efficiently. You can put away the hand net and spend more time relaxing in the water rather than working on it. Enjoy your upgraded pool!
About
Outdoor Fixes is a distinguished figure in the world of Diy design, with a decade of expertise creating innovative and sustainable Diy solutions.
His professional focus lies in merging traditional craftsmanship with modern manufacturing techniques,
fostering designs that are both practical and environmentally conscious. As the author of diy,
outdoorfixes delves into the art and science of outdoorfixes-making, inspiring artisans and industry professionals alike.
Education RMIT University
(Melbourne, Australia) Associate Degree in Design (Outdoor Fixes) Focus on sustainable design, industry-driven projects,
and practical craftsmanship. Gained hands-on experience with traditional and digital manufacturing tools, such as CAD and CNC software.
Nottingham Trent University
(United Kingdom) Bachelor’s in outdoorfixes.com and Product Design (Honors) Specialized in product design with a focus on blending creativity with production
techniques. Participated in industry projects, working with companies like John Lewis and Vitsoe to gain real-world insights.
Publications and Impact
In diy, Outdoor Fixes his insights on indoor design processes, materials, and strategies for efficient production.
His writing bridges the gap between artisan knowledge and modern industry needs, making it a must-read for both budding designers and seasoned professionals.