
A swimming pool liner lock is a fundamental component for maintaining the structural integrity and visual appeal of your vinyl liner pool, serving as a wedge that secures the liner bead into the receiver track to prevent slippage. When a liner begins to pull away from the coping, it exposes the wall behind it to water damage and creates an unsightly aesthetic, making the installation of this simple locking strip a vital maintenance task for pool owners.
This comprehensive guide on how to install liner lock serves to demystify the process of installing a liner lock, ensuring that you can tackle this project with confidence and precision without needing expensive professional help. We will walk you through the necessary preparations, the specific tools required, and a detailed installation method to ensure your pool remains beautiful and functional for years to come.
Understanding Liner Lock
To truly master the installation, one must first understand what a liner lock actually is and the physics behind why it is necessary. Also referred to as “T-bead” or “bead wedge,” a liner lock is a flexible, typically semi-rigid PVC plastic strip designed with a specific barbed or wedge-shaped profile. Its primary purpose is to fill the gap between the pool liner’s bead and the coping track (the slot the liner fits into).
Over time, vinyl liners can lose elasticity due to chemical exposure and temperature fluctuations, causing them to shrink and pull out of the track. The liner lock acts as a shim, jamming firmly into the space immediately above the liner bead, locking it vertically in place so that the tension of the water and the shrinking vinyl cannot dislodge it.
Understanding the mechanics of the liner lock reveals why proper installation is so critical. The device relies on friction and compression to function. If the lock is too loose, it will simply pop out when the liner stretches; if it is forced in incorrectly, it can damage the delicate track or tear the vinyl bead itself. The lock comes in various colors, though typically white or blue, to blend with the coping or the liner pattern.
It is sold in rolls and is cut to size. By installing this product, you are essentially reinforcing the grip of the track, counteracting the heavy downward pull of thousands of gallons of water and the horizontal tension of a shrinking liner. It is a preventative measure as much as it is a repair solution, often installed in corners where tension is highest.
Tools and Materials You May Need
There are a few tools and materials that may be helpful when installing pool coping:
- Tape measure
- Utility knife
- Caulk gun
- Silicone caulk or adhesive
- Hammer and nails or screws (depending on the type of coping)
- Coping sealant or foam gaskets (optional)
These items can typically be found at your local hardware store or pool supply store. It is important to have all necessary tools and materials on hand before beginning the installation process to ensure a smooth and efficient process.
8 Simple Step-by-step Guidelines on How to Install Liner Lock
Step 1: Inspecting the Perimeter and Diagnosing the Track Condition
Before you attempt to install the liner lock, you must conduct a thorough and detailed inspection of the entire pool perimeter to understand the extent of the issue you are facing. This involves walking around the pool’s edge and identifying not just where the liner has already popped out, but also where the tension seems high and a future pop-out is likely.
You need to look closely at the condition of the coping track itself; if the plastic track is cracked, brittle, or widening due to age, a liner lock might not be sufficient, and track repair might be needed first. You should document the areas that need attention and measure the total length required so you don’t run short of materials halfway through the job.
During this inspection phase, pay particular attention to the corners of the pool, as these are the high-stress points where liners most frequently pull away. The geometry of a rectangular or Grecian pool means the vinyl is stretched tightly across these bends, creating significant torque on the bead. If you notice the liner is “bridging”—meaning it is pulling away from the wall below the track—this indicates the liner has shrunk or shifted.
You must assess if there is enough slack to even pull the liner back up. If the gap is too large, you may need to lower the water level significantly to relieve tension before proceeding. This diagnostic step ensures you aren’t fighting physics that you can’t win and helps you plan your attack on the specific problem areas efficiently.

Step 2: Thoroughly Cleaning the Liner Track and Bead Receiver
Once you have identified the target areas, the next critical step is to ensure the environment where the lock will sit is pristine and free of debris. Over time, the small groove in the coping track can accumulate an impressive amount of dirt, sand, dead insects, calcification, and suntan oil residue. If you attempt to jam a liner lock into a dirty track, the grit will act as a barrier, preventing the lock from seating deeply enough to be effective.
Using a high-pressure hose nozzle can help blast out loose debris, but for stubborn, caked-on grime, you may need to use a small tool like a toothbrush or the previously mentioned coin wrapped in a thin cloth to scrape the channel clean.
The cleaning process must also extend to the liner bead itself—the thick edge of the vinyl that hooks into the track. This bead often gets slimy or covered in algae if it has been hanging out of the track and submerged in water. You should wipe the bead down with a mild cleanser and a rag to remove any slick biofilm.
If the bead is slippery, the friction required to hold it in place will be compromised, and even the best liner lock might fail to hold it. By ensuring both the male part (the bead) and the female part (the receiver) are dry and clean, you maximize the coefficient of friction, giving your installation the highest possible chance of long-term success.
Step 3: Preparing the Materials for Maximum Pliability
Vinyl and PVC plastics are extremely temperature-sensitive materials, and trying to work with cold, stiff plastic is a recipe for frustration and sore fingers. Step three involves preparing your materials to work with you rather than against you. Take your roll of liner lock and uncoil the amount you intend to use, then submerge it in a bucket of very hot (but not boiling) water.
Let it soak for at least 10 to 15 minutes. This thermal bath relaxes the molecular structure of the plastic, removing the “curl memory” from being rolled up and making the wedge soft and easy to manipulate into tight crevices.
While the liner lock is soaking, you should also attend to the pool liner itself. If the liner has pulled away, it is likely cold and stiff, making it difficult to stretch back up to the track. Use a heat gun or a hair dryer to gently warm the vinyl liner in the area you are working on.
You must be careful to keep the heat source moving constantly to avoid scorching or melting the vinyl. The goal is to warm the sheet until it feels soft and stretchy, like a warm rubber band. This preparation phase is the secret to a professional installation; professionals never fight with cold vinyl because they know that heat makes the material cooperative, allowing for a tighter, more secure fit without excessive physical exertion.
Step 4: Re-Seating the Liner Bead into the Receiver Track
Now that your materials are warm and pliable, you must properly seat the liner bead back into the track before you can even think about inserting the lock. This is often the most physically demanding part of the process. With the vinyl warm, grasp the liner with both hands or use the friction of your palms to pull the material upward towards the coping. You need to pull up and slightly forward to hook the bead (the thick lip at the top of the liner) over the edge of the receiver track. You should hear or feel a satisfying “snap” or click as the bead engages with the lip of the track.
If the liner is extremely tight, this is where your assistant or your patience comes into play. You may need to stretch the liner vertically by stepping gently on the liner (if you are in the pool) or pulling from the deck. Once the bead is in the groove, hold it there with one hand or use a temporary wedge (like a wooden clothespin) to keep it from popping back out while you prepare the lock.
It is imperative that the bead is seated fully and evenly; if it is twisted or only halfway in, the liner lock will not fit correctly and will create a pressure point that could permanently damage the track. Take your time to run your thumb along the entire length of the reset bead to ensure it is smooth and completely engaged with the track.

Step 5: Initial Insertion of the Liner Lock Strip
With the liner bead firmly seated in the track, retrieve your warm, pliable liner lock from the hot water bucket. Shake off the excess water and identify the correct orientation of the profile; usually, the barbed or wider side faces towards the liner bead, and the flat side faces the top of the track, but check your specific product’s diagram.
Start at one end of the area you are repairing. Insert the leading edge of the liner lock into the small gap that exists between the top of the liner bead and the upper lip of the coping track. You should insert it at a slight angle, pressing the bottom of the wedge in first, then rolling the top in.
At this stage, do not worry about getting the entire length in perfectly; focus on establishing a strong anchor point at the beginning of the run. Use your thumbs to press the lock firmly into the gap. If the fit is tight—which is a good sign—you may need to use a mild soap solution spray to lubricate the strip slightly.
However, use lubricant sparingly, as you want friction to hold it in eventually. Push the lock in until it is flush with the face of the coping. If you cannot push it in by hand, this is where you will transition to using a mechanical aid. The goal of this step is to get the first 6 to 12 inches securely fastened so that you have a stable base to work from as you move down the line.
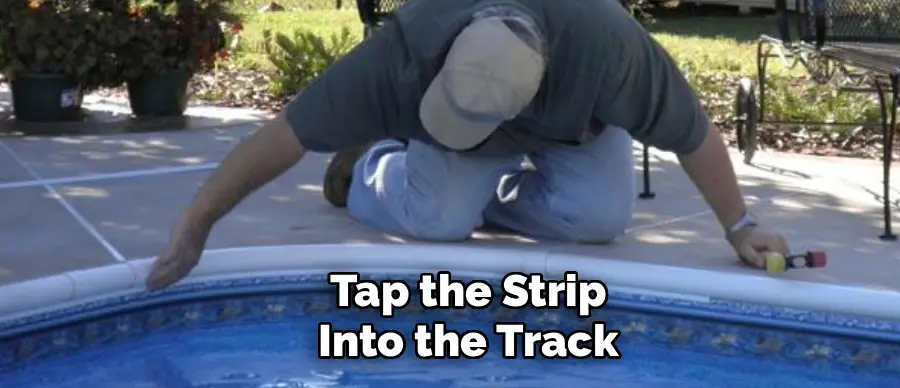
Step 6: Securing the Lock with the Rubber Mallet
Once the strip is started, you will likely find that thumb pressure alone is insufficient to seat the liner lock deeply enough for a permanent hold. This is where the rubber mallet becomes your primary tool. Holding the excess liner lock strip with one hand to guide it into the gap, use the mallet in the other hand to gently tap the strip into the track.
Do not swing the mallet like you are driving a nail; instead, use short, controlled taps. You want to strike the lock squarely so that it drives straight back into the track, rather than bending upward or downward.
Work your way along the perimeter methodically, tapping every few inches. As you tap, you will see the liner lock disappear into the groove, leaving a clean, finished look. If you encounter a spot that refuses to go in, stop and check if the liner bead has slipped or if there is debris in the track. Do not force it blindly, as you could crack the coping.
The rhythm should be: align the strip, press with the thumb, tap-tap-tap with the mallet, move three inches, and repeat. This systematic approach ensures that the pressure is distributed evenly across the track and that the lock is seated to a uniform depth, providing consistent holding power along the entire length of the pool wall.
Step 7: Navigating Corners and Obstacles
Corners are the most challenging aspect of liner lock installation because the track curves (or forms a 90-degree angle), changing the geometry of the gap. When you approach a corner, you must be extra careful. If it is a radius corner (curved), the flexible, warm liner lock should bend around it relatively easily. However, you must ensure you are pushing the material deep into the curve, as this is where the liner wants to pull away the most (“bridging”). You may need to use the heat gun again to keep the lock extra flexible as you navigate the bend.
For sharp 90-degree corners, you cannot simply bend the strip, as it will kink and fail to hold. Instead, you should cut the liner lock. Measure the strip to the exact corner point and cut it with your utility knife. Then, start a new piece for the next wall, perhaps mitering the edges slightly (cutting them at a 45-degree angle) so they meet cleanly without overlapping or leaving a large gap. This ensures that the corner—the point of highest tension—is not reliant on a stressed, bent piece of plastic but rather has dedicated support from two well-fitted straight pieces meeting together.
Pay close attention to skimmer faceplates and return jets as well; you may need to trim the lock precisely to fit up against these obstacles without interfering with their operation.
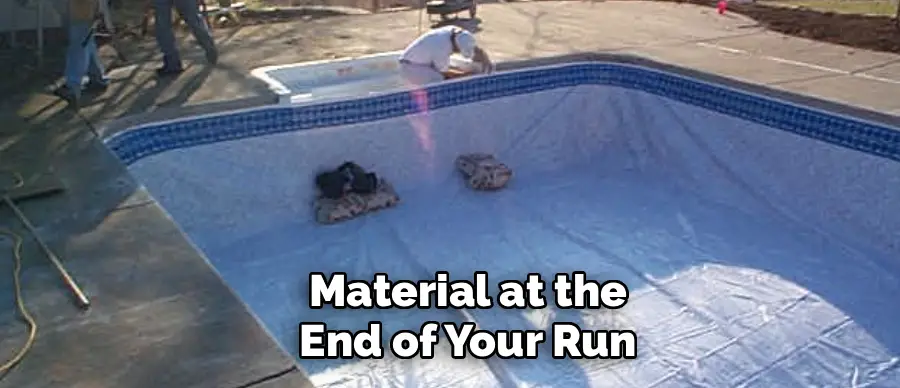
Step 8: Final Inspection and Trimming
The final step is just as important as the first. Once you have installed the liner lock around the perimeter or the affected area, you must perform a comprehensive quality control check. Walk the perimeter again and run your fingers over the installed lock. It should feel smooth and flush with the coping. If you find any areas where the lock is protruding or bulging out, use the mallet to tap them back in. If a section pops out immediately after tapping, the liner bead underneath is likely not seated correctly, and you will need to pull that section out and redo it.
Finally, trim any excess material at the end of your run. If you have gone around the full perimeter, cut the final piece so that it butts tightly against the starting piece, leaving no gap. A small gap can become a weak point where the unzipping process begins again. Once trimmed, give the entire installation a final rinse with pool water to wash away any soap residue or dirt from your hands. Stand back and observe the liner; the wrinkles on the wall should be gone or significantly reduced, and the top edge should look uniform and secure. This final verification confirms that the structural integrity of the liner attachment is restored.
Following these steps on how to install liner lock in your pool can ensure a smooth and efficient installation process. It is important to note that if you encounter any difficulties or have questions, it is best to consult a professional pool installer for assistance.
Maintenance and Care
To ensure the longevity of your newly installed liner lock, inspect it periodically, especially at the start and end of the swimming season, looking for any signs of it backing out of the track. Avoid using harsh abrasive chemicals directly on the lock strip when cleaning the “bathtub ring” around the pool, as this can degrade the plastic over time.
If you notice a small section popping out, tap it back in immediately with a rubber mallet before the liner has a chance to pull away. Winterizing your pool correctly is also crucial; using air pillows and proper covers reduces the drag on the liner during freezing months, protecting the lock from excessive tension. Finally, keep the pool water chemistry balanced, as low pH can cause the vinyl to shrink, putting undue stress on the lock system.
Safety Precautions and Considerations
Safety should always be the paramount concern when working around a swimming pool. The most obvious risk is falling into the water; since you will be working on the very edge of the deck, often leaning over, it is easy to lose your balance. Wear non-slip shoes with good grip, and if you are working from inside the pool, be mindful that the liner floor can be incredibly slippery. It is advisable to have a second person nearby, not just to help with the work, but to assist in case you slip or fall.
Furthermore, be cautious when using electrical appliances like heat guns or hair dryers near the water. Ensure that any extension cords are rated for outdoor use and are plugged into a GFCI (Ground Fault Circuit Interrupter) outlet to prevent electric shock if the tool accidentally falls into the pool. When using a utility knife to cut the tough plastic of the liner lock, always cut away from your body and be extremely careful not to slip and slice the pool liner, which would turn a minor repair into a major, expensive disaster. Lastly, protect your hands; the plastic track and the lock itself can have sharp edges, so wearing fitted work gloves can prevent cuts and blisters during the installation.
How Much Will It Cost?
The cost of installing a liner lock is relatively low, making it one of the most cost-effective repairs a pool owner can undertake. The liner lock material itself is inexpensive, typically sold in rolls of 120 feet or more, costing anywhere from $25 to $50, depending on the brand and thickness. If you only need to repair a small section, you might find shorter lengths for under $20. This makes the material cost negligible compared to the cost of a new liner.
Regarding tools, if you do not already own them, a rubber mallet will cost around $10, and a utility knife is roughly $5. You likely already have a hair dryer or bucket at home. Therefore, the total DIY project cost can often be kept under $60 to $80. However, if you choose to hire a pool professional to do this for you, the cost will rise significantly due to labor. Service calls generally start at $100 to $150, and they may charge an hourly rate on top of that. Given that this project is labor-intensive but technically simple, doing it yourself offers massive savings.
Frequently Asked Questions
Q1: How Do I Know If My Liner Lock Is Installed Correctly?
A1: You can identify a correctly installed liner lock by both visual and tactile inspection. Visually, the lock should sit flush against the pool coping, creating a uniform, continuous strip without any bulging, twisting, or gaps between the segments. When you run your hand along the track, it should feel solid and immovable; if you can easily pry it out with your fingernail, it is too loose and not doing its job.
Additionally, the liner underneath should appear taut and smooth, with the bead completely hidden from view inside the track. If you see the bead peeking out or the lock sticking out at an angle, the installation needs to be adjusted.
Q2: Can I Reuse Old Liner Lock Or Should I Buy New?
A2: While it is physically possible to reuse an old liner lock if it is still flexible and intact, it is generally highly recommended to purchase new material. Over time, the PVC plastic of the liner lock is exposed to UV rays, pool chemicals, and temperature cycles, causing it to become brittle, hard, and deformed. Old locks often retain the shape of the previous installation and loses its “spring” or elasticity, meaning they won’t grip the track as tightly as a fresh piece. Given the very low cost of new liner lock rolls, reusing old, degraded plastic is a false economy that often leads to the liner popping out again shortly after the repair.
Q3: What Should I Do If The Liner Lock Keeps Popping Out?
A3: If your liner lock repeatedly pops out of the track, it indicates that the underlying issue has not been resolved or that the gap is too wide for the standard lock. First, ensure the track is impeccably clean and that the liner bead is fully seated; debris can prevent a deep lock. If the track itself has widened due to age or freeze damage, the standard liner lock may be too thin.
In this case, you can purchase thicker variations of liner lock or “heavy-duty” bead wedges designed specifically for worn-out tracks. Alternatively, using a small amount of clear silicone adhesive in the track before inserting the lock can provide the extra adhesion needed to keep it secure in problematic areas.
Q4: Is It Necessary To Drain The Pool To Install Liner Lock?
A4: No, it is almost never necessary to drain the pool completely to install a liner lock, and in fact, draining the pool can be dangerous for the liner as it may shrink rapidly without the weight of the water. Typically, you can install a liner lock with the water at its normal level.
However, if the liner has pulled away significantly and needs to be stretched back into place, you might need to lower the water level by 6 to 12 inches to reduce the tension on the vinyl. This slight reduction in water weight gives you enough slack to pull the bead up. Once the lock is installed, you can refill the pool immediately.
Conclusion
In summary, the installation of a liner lock is a straightforward yet essential task for preserving the life and look of your vinyl pool. It acts as the final line of defense against the natural tendency of vinyl to shrink and pull away, securing your investment against costly damage. By understanding the mechanics of the bead and track system, gathering the simple tools required, and following the detailed eight-step procedure outlined above, you can achieve professional-grade results on a DIY budget.
Regular maintenance and timely intervention are key; ignoring a small section of slipped liner can lead to extensive wall damage and the need for a total liner replacement. Whether you are performing a quick repair on a corner or proactively locking in the entire perimeter, the effort you put into installing a liner lock pays dividends in peace of mind. With patience, a bit of warmth, and the right technique, your pool will remain a. Thanks for reading this guide on how to install liner lock.
About
Outdoor Fixes is a distinguished figure in the world of Diy design, with a decade of expertise creating innovative and sustainable Diy solutions.
His professional focus lies in merging traditional craftsmanship with modern manufacturing techniques,
fostering designs that are both practical and environmentally conscious. As the author of diy,
outdoorfixes delves into the art and science of outdoorfixes-making, inspiring artisans and industry professionals alike.
Education RMIT University
(Melbourne, Australia) Associate Degree in Design (Outdoor Fixes) Focus on sustainable design, industry-driven projects,
and practical craftsmanship. Gained hands-on experience with traditional and digital manufacturing tools, such as CAD and CNC software.
Nottingham Trent University
(United Kingdom) Bachelor’s in outdoorfixes.com and Product Design (Honors) Specialized in product design with a focus on blending creativity with production
techniques. Participated in industry projects, working with companies like John Lewis and Vitsoe to gain real-world insights.
Publications and Impact
In diy, Outdoor Fixes his insights on indoor design processes, materials, and strategies for efficient production.
His writing bridges the gap between artisan knowledge and modern industry needs, making it a must-read for both budding designers and seasoned professionals.