
A swimming pool is the centerpiece of summer fun, but over time, the vinyl liner can fade, stretch, or tear. Replacing it might seem like a daunting task reserved for professionals, but with the right preparation and patience, it is a project you can tackle yourself. A beaded liner is particularly user-friendly because it snaps into a track around the pool’s edge, eliminating the need to dismantle the top rails.
This design makes installation cleaner and often faster than overlap liners. By doing it yourself, you can save significant labor costs while ensuring your pool looks pristine for the upcoming season. This comprehensive guide will walk you through exactly how to install a beaded pool liner, transforming your backyard oasis into a sparkling retreat once again.
Replacing your pool liner might seem like a daunting task, but with the right tools and guidance, it can be a straightforward and rewarding project. Not only does a fresh liner enhance the overall appearance of your pool, but it also ensures a longer lifespan and a better swimming experience. Paying close attention to detail during the installation process will help avoid common issues and allow you to enjoy a smooth, wrinkle-free liner for seasons to come.
Why Should You Invest in Replacing Your Pool Liner?
Over time, pool liners can become worn, faded, or damaged due to constant exposure to sunlight, chemicals, and regular use. A deteriorating liner not only diminishes the aesthetic appeal of your pool but can also lead to leaks and inefficiencies, potentially increasing maintenance costs. Replacing your liner ensures a watertight seal, protects the structural integrity of your pool, and revitalizes its appearance. It’s a proactive step that promotes safety, reduces upkeep, and maximizes your enjoyment of the pool for years to come.
Tools and Materials
To successfully replace your pool liner, you will need a variety of tools and materials to ensure the process goes smoothly. Here is a list of common items required:
- New Pool Liner: Choose a high-quality liner that matches your pool’s size, shape, and design preferences.
- Measuring Tape: Essential for ensuring the liner fits accurately.
- Utility Knife or Scissors: For precise trimming and adjustments.
- Liner Lock or Bead Wedge: Used to secure the liner in place.
- Vacuum or Shop Vac: Helps remove air pockets during liner installation.
- Pool Brush: For cleaning the pool walls and floor before the liner is installed.
- Patch Kit: Useful for repairing any small damages to the liner during installation.
- Rubber Mallet: Assists in securing liner accessories gently without causing damage.
- Adhesive or Liner Glue (if applicable): Ensures proper sealing in certain pool designs.
Having these tools and materials prepared in advance will streamline the replacement process and help you achieve a professional-looking result.
Step-by-Step Guide on How to Install a Beaded Pool Liner
Step 1: Drain the Pool and Remove the Old Liner
The first phase of this project involves draining all the water from your swimming pool. You will need a submersible pump to remove the water efficiently, directing it to a safe drainage area away from your home’s foundation.
Once the pool is completely empty, cut the old liner into manageable strips using a sharp utility knife or box cutter. Be extremely careful not to damage the pool walls or the floor base underneath. Remove all the old vinyl material and dispose of it properly. You must also remove the faceplates from the skimmer, return jet, and any other fittings, keeping the screws safe for reinstallation later.

Step 2: Prepare the Floor Base
With the old liner gone, the pool floor is exposed and ready for inspection. This is the most critical time to fix any imperfections. If you have a sand base, smooth out any divots, footprints, or uneven areas using a broom or a trowel.
If you have a concrete or vermiculite floor, sweep it thoroughly to remove any debris, pebbles, or sharp objects that could puncture the new vinyl. For added protection and a smoother feel underfoot, consider installing a new layer of wall foam or a floor pad. Tape the seams of the floor pad securely to ensure it does not shift during the installation process.
Step 3: Position the New Liner in the Pool
Wait for a warm, sunny day to begin the actual installation, as the heat will make the vinyl more pliable and easier to stretch. Carefully take the new liner out of the box and place it in the center of the pool. Unfold it slowly, being careful not to drag it across rough surfaces.
Locate the center of the liner and align it with the center of your pool. If your pool is oval or rectangular, ensure the corners of the liner match the corners of the pool structure. Proper alignment at this stage is crucial to prevent wrinkles and uneven stretching later on.
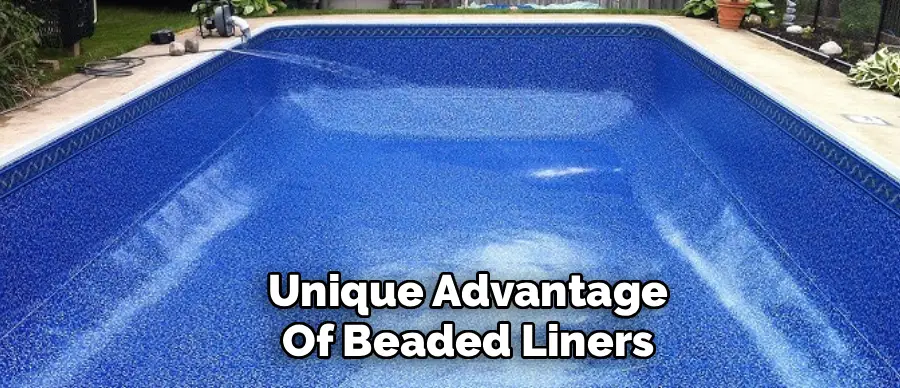
Step 4: Snap the Liner Bead into the Receiver Track
This step defines the unique advantage of beaded liners. Locate the thick, reinforced edge of the liner, known as the bead. Starting at any point along the wall, insert this bead firmly into the liner receiver track that runs along the top of the pool wall.
You should feel or hear it snap into place. Work your way around the perimeter of the pool, inserting the bead into the track. If the liner feels tight or difficult to stretch, let it sit in the sun for a while longer to soften. Ensure the bead is fully seated around the entire circumference of the pool before proceeding.
Step 5: Use a Shop Vac to Remove Air
To achieve a professional, wrinkle-free fit, you need to vacuum the air out from behind the liner. Insert the hose of a heavy-duty shop vacuum through the skimmer opening or down behind the liner at the top wall, sealing the opening with duct tape to make it airtight.
Turn on the vacuum. As the air is sucked out, the liner will be pulled tight against the walls and floor. While the vacuum is running, get into the pool (shoes off!) and gently push any wrinkles toward the walls using a soft broom or your feet. This suction technique ensures a smooth, custom fit.
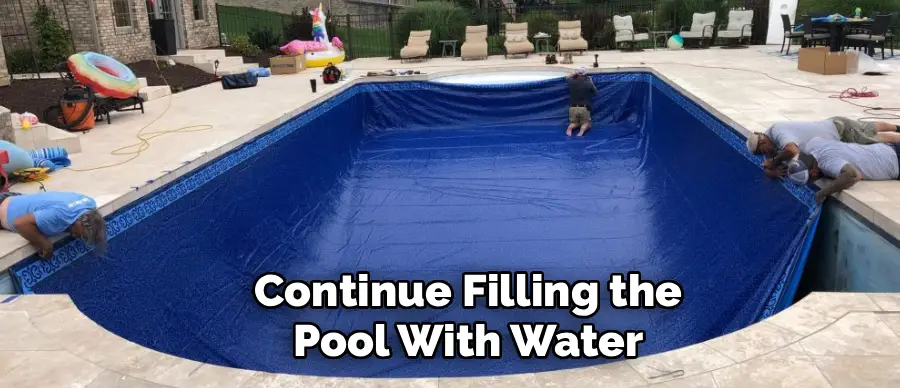
Step 6: Begin Filling the Pool with Water
Keep the vacuum running while you start filling the pool with a garden hose. The vacuum holds the liner in place as the weight of the water begins to set it. Once there is about six inches of water in the deep end or across the entire floor, and the liner is firmly held against the wall by the water pressure, you can turn off the vacuum and remove the hose. If any wrinkles remain on the floor, you must work them out now before the water level gets too high, as the immense weight of the water will make adjustments impossible later.
Step 7: Reinstall Faceplates and Cut Openings
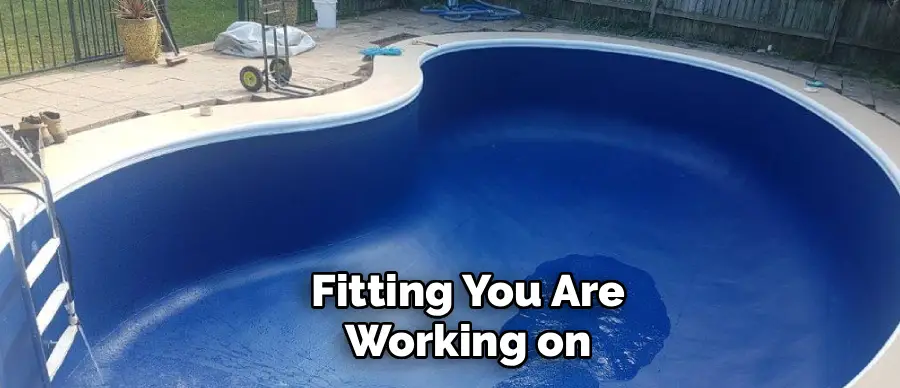
Do not cut any holes in the new liner until the water level reaches just below the fitting you are working on. This allows the liner to stretch into its final position properly. When the water is a few inches below the main drain (if applicable), skimmer, or return jet, locate the screw holes through the vinyl by feel.
Install the gasket and faceplate, tightening the screws securely. Only after the faceplate is fully installed should you use a sharp blade to cut out the vinyl material inside the frame. Repeat this process for all fittings as the water level rises.
Step 8: Final Inspection and Fill
Continue filling the pool to the desired operating level, typically halfway up the skimmer opening. As the water rises, keep a close eye on the liner to ensure it remains seated in the track and that no new stress points develop. Once the pool is full, balance your water chemistry immediately.
Add the necessary sanitizers and balancers to protect the new liner and ensure the water is safe for swimming. Reassemble your ladder or steps, being careful to use protective mats if they rest on the liner. Your installation is now complete, and your pool is ready for enjoyment.
Step 9: Cut Openings (Skimmer & Return)
After the pool is filled and the liner is securely in place, it’s time to carefully cut the openings for the skimmer and return. Begin by ensuring the liner is snugly seated and free of wrinkles around these areas. Using the skimmer faceplate as a guide, attach it over the liner and tightly secure all screws.
Once the faceplate is in place, use a sharp utility knife to carefully cut out the liner material within the skimmer opening, following the edge of the faceplate. Repeat this process for the return fitting. Attach the gaskets and fittings securely to prevent any leaks. Double-check all connections to ensure they are watertight. This step completes the setup process and prepares your pool for proper circulation.
Step 10: Finish Filling & Reassemble
Once all connections have been secured and double-checked, continue filling the pool with water until it reaches the appropriate level, typically halfway up the skimmer opening. Monitor the process to ensure no leaks occur and that the liner remains smooth and free of wrinkles.
During this time, reassemble any components that were removed during the initial setup, such as ladders, lights, or other accessories. Carefully follow the manufacturer’s instructions for each piece of equipment to ensure proper installation. Once the water level is adequate and all parts are in place, your pool is ready for priming the pump and starting the filtration system. Now, you can enjoy the fruits of your hard work with a fully operational and inviting pool.
Maintenance and Care Advice
Proper maintenance and care are essential to keep your pool in excellent condition and ensure its longevity. Begin by regularly testing the water chemistry to maintain balanced pH, chlorine, and alkalinity levels. This step is crucial for preventing algae growth and ensuring the water is safe for use. Clean the pool filter as recommended by the manufacturer to keep the filtration system running efficiently.
Skim the surface daily to remove leaves, insects, and other debris, and vacuum the pool floor periodically to prevent dirt and sediment from accumulating. Additionally, inspect all pool equipment, including pumps, hoses, and lights, for signs of wear or damage and address any issues promptly. By adhering to a regular maintenance schedule, your pool will remain clean, safe, and a source of enjoyment for years to come.
Vacuum Installation Process
Installing a vacuum system for your pool is a straightforward process that ensures your pool stays clean and free of debris. Begin by assembling the vacuum head, telescopic pole, and vacuum hose. Attach the hose securely to the vacuum head and connect the other end to the skimmer or dedicated suction port, ensuring it fits snugly. Before starting, submerge the vacuum head and hose entirely to remove any air pockets, which can interfere with proper suction.
Next, turn on the pool pump and set the filter system to the appropriate setting, typically “Filter” or “Vacuum to Waste,” depending on the amount of debris. Slowly maneuver the vacuum head across the pool floor in overlapping strokes to ensure thorough cleaning. Be methodical and avoid rushing, as this ensures even coverage. If the vacuum loses suction, check for air leaks in the hose or clogs in the skimmer basket.
Frequently Asked Questions
What Is the Difference Between a Beaded Liner and an Overlap Liner?
The main difference lies in how they attach to the pool wall. An overlap liner hangs over the pool wall and is secured with plastic coping strips, requiring you to remove the top rails for installation. A beaded liner has a thick, reinforced edge (the bead) that snaps directly into a track or receiver mounted on the pool wall. This allows you to install or replace the liner without disassembling the top ledges of the pool, making the process much easier.
What Temperature Should It Be to Install a Pool Liner?
Ideally, the temperature should be at least 70 degrees Fahrenheit (21 degrees Celsius), with plenty of sunshine. Vinyl liners are made of PVC, which becomes stiff and brittle in cold weather but soft and pliable in the heat. Installing on a warm, sunny day allows the liner to stretch easily into place, reducing the risk of wrinkles and making it much easier to snap the bead into the track. If it is too cold, the liner may be too tight to fit.
Can I Install a Beaded Liner on an Overlap Pool?
Yes, you can convert an overlap pool to accept a beaded liner. To do this, you will need to purchase and install “bead receiver” strips. These plastic strips hook onto the top of the pool wall (where the overlap liner used to sit) and provide a track for the new beaded liner to snap into. Once these receivers are installed, you can use standard beaded liners for all future replacements, simplifying the maintenance process.
How Long Does a Beaded Pool Liner Last?
On average, a vinyl pool liner will last between 10 and 15 years, although this can vary depending on several factors. Proper water chemistry is the most critical factor; chronically unbalanced water can cause the vinyl to become brittle, fade, or wrinkle prematurely. Additionally, the amount of direct sunlight, the use of a pool cover, and the thickness (gauge) of the liner itself all play a role in its longevity.
Do I Need to Replace the Felt or Foam Padding?
It is highly recommended to inspect the underlying padding whenever you replace the liner. While you don’t always have to replace it, doing so is often a wise investment. The padding protects the liner from the rough texture of the pool floor (sand or concrete) and provides a soft cushion for swimmers’ feet. If the old padding is moldy, torn, or compressed, replacing it ensures your new liner has the best possible protection and feel.
Conclusion
Installing a new pool liner is a substantial project that offers immense rewards in terms of cost savings and satisfaction. By choosing a beaded liner, you simplify the process significantly, avoiding the need for extensive disassembly of your pool’s structure.
The key to success lies in careful preparation of the pool base, waiting for the right weather conditions to ensure the vinyl is pliable, and using a vacuum to ensure a smooth and wrinkle-free installation. With proper care and maintenance, your new liner will provide years of enjoyment for you and your family.
About
Outdoor Fixes is a distinguished figure in the world of Diy design, with a decade of expertise creating innovative and sustainable Diy solutions.
His professional focus lies in merging traditional craftsmanship with modern manufacturing techniques,
fostering designs that are both practical and environmentally conscious. As the author of diy,
outdoorfixes delves into the art and science of outdoorfixes-making, inspiring artisans and industry professionals alike.
Education RMIT University
(Melbourne, Australia) Associate Degree in Design (Outdoor Fixes) Focus on sustainable design, industry-driven projects,
and practical craftsmanship. Gained hands-on experience with traditional and digital manufacturing tools, such as CAD and CNC software.
Nottingham Trent University
(United Kingdom) Bachelor’s in outdoorfixes.com and Product Design (Honors) Specialized in product design with a focus on blending creativity with production
techniques. Participated in industry projects, working with companies like John Lewis and Vitsoe to gain real-world insights.
Publications and Impact
In diy, Outdoor Fixes his insights on indoor design processes, materials, and strategies for efficient production.
His writing bridges the gap between artisan knowledge and modern industry needs, making it a must-read for both budding designers and seasoned professionals.