Backyard concrete surfaces like patios, walkways, and pool decks are the foundation of our outdoor living spaces. Over time, however, these areas can become marred by dirt, grime, and unsightly stains. A once-pristine patio can quickly look neglected due to green moss in shady corners, dark grease spots near the grill, or general dinginess from foot traffic. Keeping this concrete clean is about more than just appearances; it is a matter of safety.
Algae and moss can become incredibly slick when wet, creating a serious slip hazard. This comprehensive guide will show you how to clean backyard concrete effectively, restoring its look and safety. We will explore various methods, from simple household solutions for minor touch-ups to the power of a pressure washer for a deep, transformative clean.

Assessing Your Concrete’s Condition and Stain Types
Before you begin cleaning, it is essential to take a moment to assess the condition of your concrete and identify the types of stains you are dealing with. A quick inspection will help you choose the most effective cleaning method and avoid causing any unintended damage. Backyard concrete is susceptible to a variety of blemishes, each with its own unique characteristics. You may find grease spatters from a barbecue, dark oil spills near a stored lawnmower, stubborn rust marks from old metal furniture, or the familiar green and black hues of organic growth like moss and algae. Recognizing what you are up against is the first step toward a successful cleaning project.
Identifying Organic Stains vs. Chemical Spills
Learning to distinguish between different stain types will guide your treatment strategy. Organic stains, such as mold, mildew, and algae, typically appear as green, black, or sometimes slimy patches. They thrive in damp, shady areas and are often the primary cause of slippery surfaces. On the other hand, chemical spills, like oil from a car or grease from a grill, present as dark, soaked-in spots that can feel slightly greasy to the touch. These stains penetrate the porous surface of the concrete and often require a degreasing agent to break them down effectively.
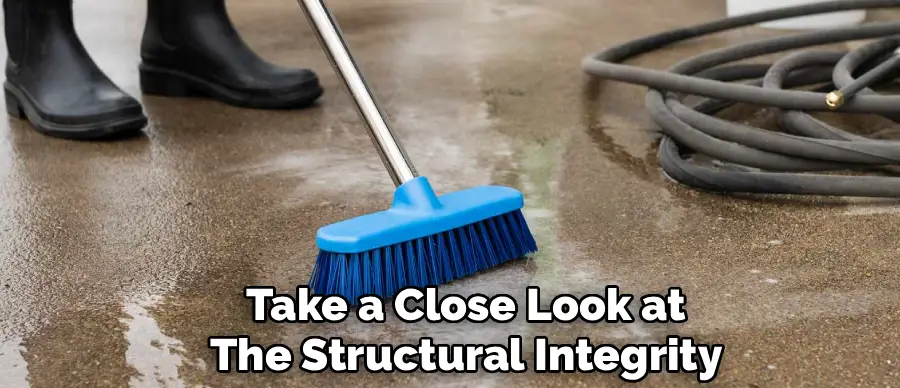
Checking for Cracks and Structural Damage
While you are inspecting the stains, take a close look at the structural integrity of the concrete itself. Look for any significant cracks, crumbling edges, or areas where the surface is spalling or flaking away. It is crucial to identify this damage beforehand because applying high-pressure water or harsh chemicals can exacerbate these issues. High pressure can chip away at weak spots and drive water deep into existing cracks, potentially worsening them during freeze-thaw cycles. If you find significant structural damage, you may need to address those repairs before proceeding with an aggressive cleaning method.
Essential Tools and Safety Gear for Concrete Cleaning
Gathering the right tools and safety equipment before you start is crucial for an efficient and safe cleaning process. Having everything on hand prevents interruptions and ensures you are protected from chemicals and high-pressure water. Safety should always be your top priority, especially when working with pressure washers or chemical cleaning solutions.
Protective Equipment You Need
Always protect yourself during a cleaning project. Essential safety gear includes a pair of safety goggles or glasses to shield your eyes from chemical splashes and flying debris. Waterproof gloves are necessary to protect your skin from detergents and degreasers, which can irritate it. Finally, wear sturdy, closed-toe shoes to protect your feet from the high-pressure water stream and any heavy tools you might be handling.
Cleaning Tools Breakdown
Your cleaning arsenal will depend on your chosen method, but some tools are universally helpful. A stiff-bristle broom is essential for sweeping away loose debris before you start. For manual scrubbing, a long-handled deck brush or a smaller scrub brush will be your primary tool. You will also need a garden hose with a good spray nozzle for rinsing. If you plan to pressure wash, you will need a pressure washer rated appropriately for residential concrete, typically between 2000 and 3000 PSI, along with different nozzle tips for various tasks.
Preparing the Area for Cleaning
Proper preparation of the cleaning area is a quick but vital step that protects your property and makes the job easier. This involves clearing the space and safeguarding any surrounding landscaping that could be affected by water runoff or cleaning solutions.
Protecting Nearby Plants and Lawns
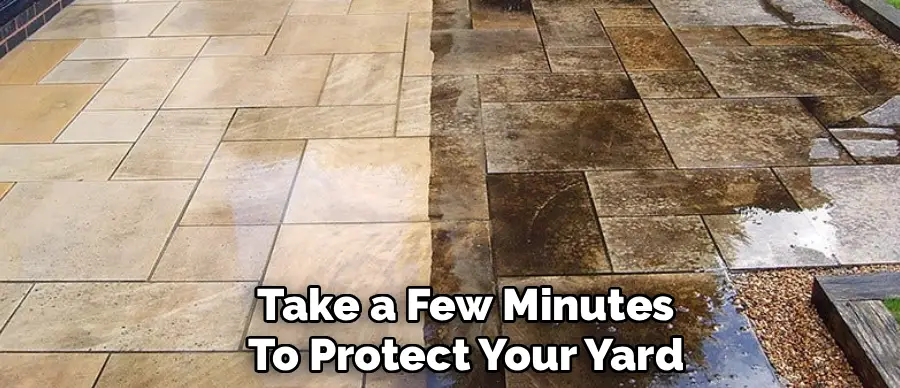
Before you introduce any water or cleaners, take a few minutes to protect your yard. Cover delicate plants, flowers, and vegetable gardens with plastic tarps to shield them from chemical overspray. As an additional precaution, it is a good practice to thoroughly pre-wet your lawn and any nearby shrubs with a garden hose. Saturating the soil and grass with plain water helps to dilute any chemical runoff, minimizing the risk of damage to your landscaping.
Step-by-Step Guide: How to Clean Backyard Concrete
This guide provides a universal method for a deep clean that is applicable to most general backyard concrete surfaces. Whether you opt for manual scrubbing or a pressure washer, following these steps in order will yield the best results, transforming your grimy patio into a clean, inviting space.
Step 1: Clear Debris and Sweep Thoroughly
The first step in any concrete cleaning project is to clear the canvas. Remove all furniture, planters, grills, and decorative items from the area. Once the surface is clear, use a stiff-bristle broom to thoroughly sweep away all loose debris. Pay close attention to corners and edges where leaves, dirt, and twigs tend to accumulate. This step is crucial because it prevents you from simply turning loose dirt into a muddy mess once you introduce water, making the rest of the cleaning process far more effective.
Step 2: Pre-Treat Tough Stains
With the surface swept clean, you can now focus on any stubborn stains you identified earlier. Spot-treating these areas before washing the entire surface gives the cleaning solution more time to work on the toughest grime. Apply a concentrated degreaser to oil spots or a specialized rust remover to rust stains. For deep-set organic stains, you can apply a concrete cleaner or a bleach solution directly to the area. Let the pre-treatment sit for the time recommended by the manufacturer, typically 10-15 minutes, allowing it to penetrate and break down the stain.
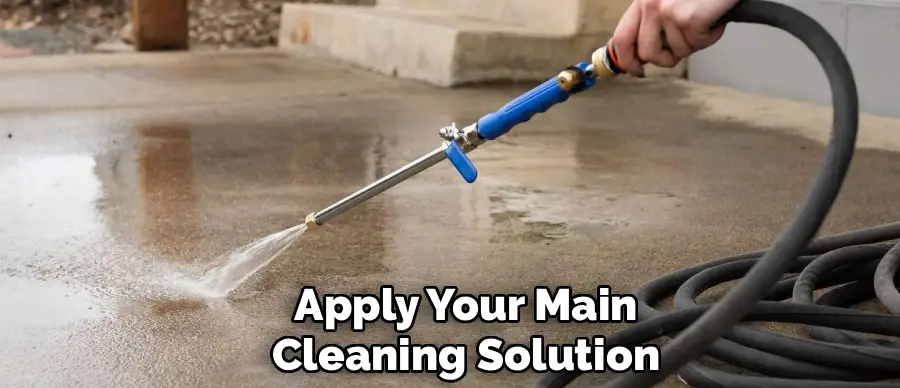
Step 3: Apply Your Chosen Cleaning Solution
Now it is time to apply your main cleaning solution to the entire concrete surface. Whether you are using a commercial concrete cleaner, a DIY vinegar solution, or a detergent, apply it evenly across the area. You can use a garden sprayer for liquid cleaners or simply pour and spread the solution with your broom.
The most important part of this step is to let the cleaner “dwell” on the surface. This means allowing it to sit for 10 to 20 minutes to break down dirt and grime. Be sure to keep the surface damp during this time; do not let the cleaner dry out, as it will lose its effectiveness. A light mist from the hose can keep it activated.
Step 4: Scrub or Pressure Wash the Surface
Once the cleaner has had time to work, it is time for agitation. If you are cleaning manually, use a stiff-bristle deck brush to scrub the entire surface. Work in sections and use firm, circular motions to lift the dirt from the porous concrete.
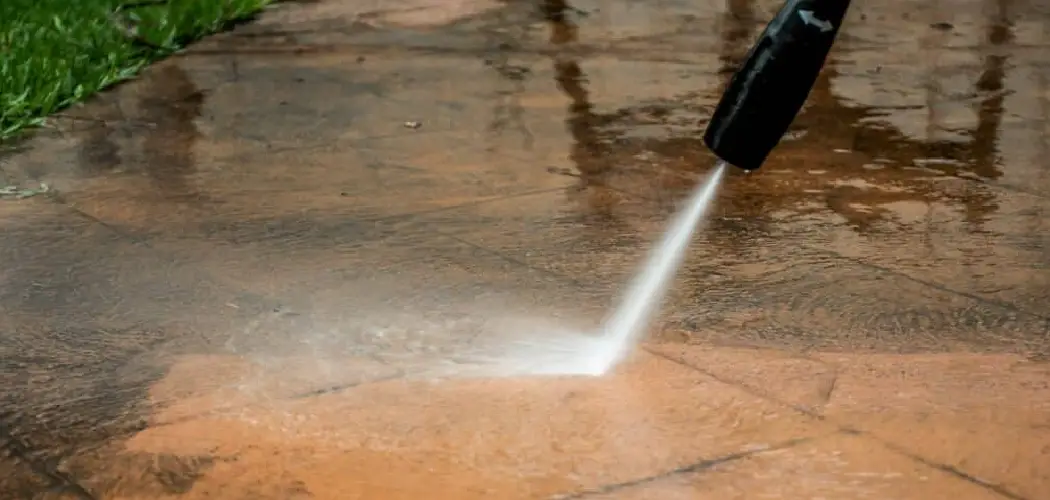
If you are using a pressure washer, select a 25-degree or 40-degree nozzle tip to start. Hold the wand at a consistent angle and keep the nozzle about 12 inches from the surface. Work in long, sweeping, overlapping strokes to avoid creating “zebra stripes” or lines. Move methodically from one end of the patio to the other.
Step 5: Rinse and Dry
The final step is to thoroughly rinse the entire area. Using a garden hose with a high-pressure nozzle or the pressure washer on a low-pressure setting, wash away all the dislodged grime and chemical residue. Start at the highest point of the concrete and work your way down, directing the water toward a drainage area and away from your home’s foundation and plant beds. A final, thorough rinse is critical to ensure no slippery cleaner residue is left behind. Allow the concrete to air dry completely to reveal your newly cleaned surface.
DIY Cleaning Solutions Using Household Items
For routine cleaning or for homeowners who prefer budget-friendly and eco-conscious options, many effective cleaning solutions can be mixed using common household items. These remedies are excellent for tackling light to moderate dirt and certain types of stains without resorting to harsh commercial chemicals.
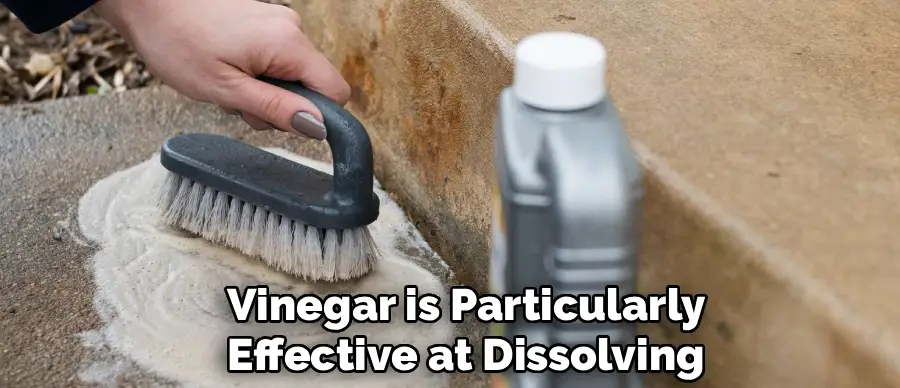
Vinegar and Water Solution
A simple mixture of equal parts white vinegar and water creates a powerful, all-purpose concrete cleaner. The mild acetic acid in vinegar is particularly effective at dissolving efflorescence (those chalky white deposits) and cutting through mildew and light algae growth. Simply mix the solution in a garden sprayer, apply it to the concrete, let it sit for about 20 minutes, scrub with a brush, and rinse thoroughly.
Baking Soda and Detergent Paste
For greasy spots left behind by the grill or food spills, a paste made from baking soda and a little dish detergent can work wonders. Mix baking soda with enough liquid dish soap to form a thick, paste-like consistency. Apply the paste directly to the grease stain and let it sit for about 30 minutes. The detergent helps to break down the oil, while the baking soda provides a gentle abrasive to help lift the stain. After letting it dwell, scrub the area with a stiff brush and rinse away.
Using Commercial Cleaners and Degreasers
Sometimes, household remedies are not enough to tackle years of built-up grime or deep-set chemical stains. In these cases, upgrading to a specialized commercial cleaner can provide the heavy-duty power needed to restore your concrete. These products are formulated to target specific problems, from pet messes to stubborn oil slicks.
Enzyme Cleaners for Pet Messes
If your patio serves as a space for pets, you may encounter organic stains and odors from pet accidents. Enzyme-based cleaners are specifically designed to handle this problem. The enzymes in the formula work to break down the proteins in pet waste, effectively eliminating both the stain and the odor at a molecular level, rather than just masking them. They are a safe and effective choice for keeping pet-frequented areas clean and fresh.
Heavy-Duty Degreasers for Driveways and Patios
For deep, stubborn oil or grease stains often found on driveways or near workshops, a heavy-duty concrete degreaser is your best option. These powerful solvents are formulated to penetrate the porous concrete and emulsify the oil, making it possible to rinse it away. When using these products, it is critical to follow the manufacturer’s safety instructions carefully, as they are often more caustic than general-purpose cleaners.
Maintenance Tips to Keep Concrete Clean Longer
After putting in the effort to clean your backyard concrete, you will want the results to last as long as possible. A little proactive maintenance can go a long way in preventing the rapid return of dirt and stains, extending the time between deep cleanings.
Sealing Your Concrete
One of the most effective ways to protect your concrete is to apply a quality concrete sealer after it is clean and completely dry. A sealer works by creating a protective barrier on the surface, which helps to repel water, oil, and other stains. This not only makes future cleanups much easier but also helps protect the concrete from damage caused by water penetration and freeze-thaw cycles. Applying a sealer every few years is a wise investment in the longevity and appearance of your patio.
Regular Sweeping and Spot Cleaning
Do not underestimate the power of a simple routine. Sweeping your patio or walkways once a week prevents leaves, dirt, and other organic debris from sitting on the surface, where they can decompose and cause stains. When spills or new stains do occur, address them quickly. Spot cleaning a small mess as soon as it happens is much easier than trying to remove a deep-set stain later on.
Conclusion
A clean concrete patio or walkway can dramatically improve the overall look of your home’s exterior and ensure a safe environment for your family and guests. As we have seen, knowing how to clean backyard concrete is a manageable task when you break it down into a few key stages: assessing the stains, preparing the area, and choosing the right cleaning method for the job.
Whether you opt for a gentle scrub with a vinegar solution or a full reset with a pressure washer, patience and proper technique are essential. Always prioritize safety by wearing protective gear and start with the gentlest cleaning method possible. Now you have the knowledge to get out there, prep your backyard for the season, and enjoy your beautifully restored outdoor space.
About
Outdoor Fixes is a distinguished figure in the world of Diy design, with a decade of expertise creating innovative and sustainable Diy solutions.
His professional focus lies in merging traditional craftsmanship with modern manufacturing techniques,
fostering designs that are both practical and environmentally conscious. As the author of diy,
outdoorfixes delves into the art and science of outdoorfixes-making, inspiring artisans and industry professionals alike.
Education RMIT University
(Melbourne, Australia) Associate Degree in Design (Outdoor Fixes) Focus on sustainable design, industry-driven projects,
and practical craftsmanship. Gained hands-on experience with traditional and digital manufacturing tools, such as CAD and CNC software.
Nottingham Trent University
(United Kingdom) Bachelor’s in outdoorfixes.com and Product Design (Honors) Specialized in product design with a focus on blending creativity with production
techniques. Participated in industry projects, working with companies like John Lewis and Vitsoe to gain real-world insights.
Publications and Impact
In diy, Outdoor Fixes his insights on indoor design processes, materials, and strategies for efficient production.
His writing bridges the gap between artisan knowledge and modern industry needs, making it a must-read for both budding designers and seasoned professionals.