
Summer is just around the corner, and who wouldn’t want to enjoy a cool dip in their backyard pool? It is important to know how to lay pavers around a pool.
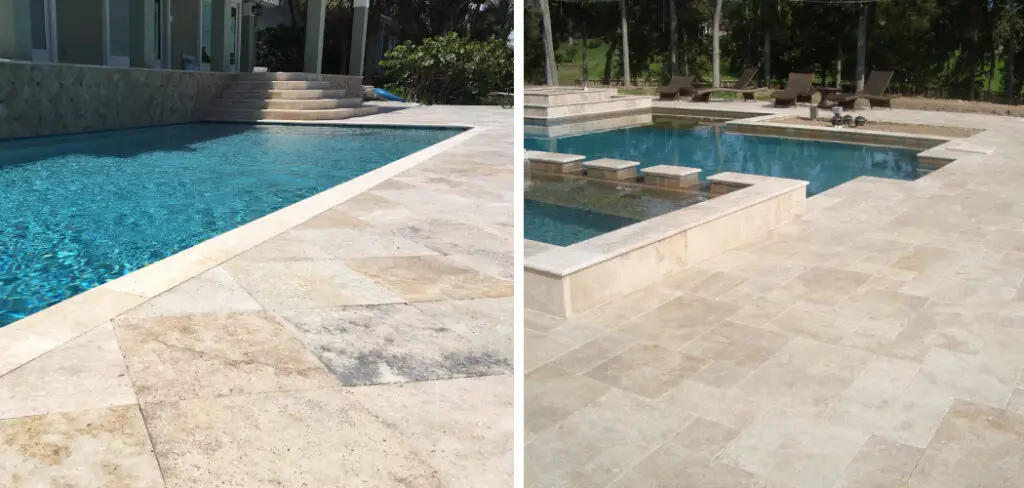
Whether you are planning for a brand-new pool installation or simply want to spruce up its surrounding area with a beautiful patio, laying pavers around your pool can add some eye-catching charm and extra aesthetic points.
This task doesn’t require an expert contractor – it’s something that any homeowner or DIYer can do on their own. And to make things easier, here’s our comprehensive guide that will walk you through all of the necessary steps involved in laying down pavers around your beloved swimming spot!
Tools You Will Need
- Shovel
- Level
- Sand
- Pavers
- Hammer or mallet
- Landscape fabric
6 Steps Guide on How to Lay Pavers Around a Pool
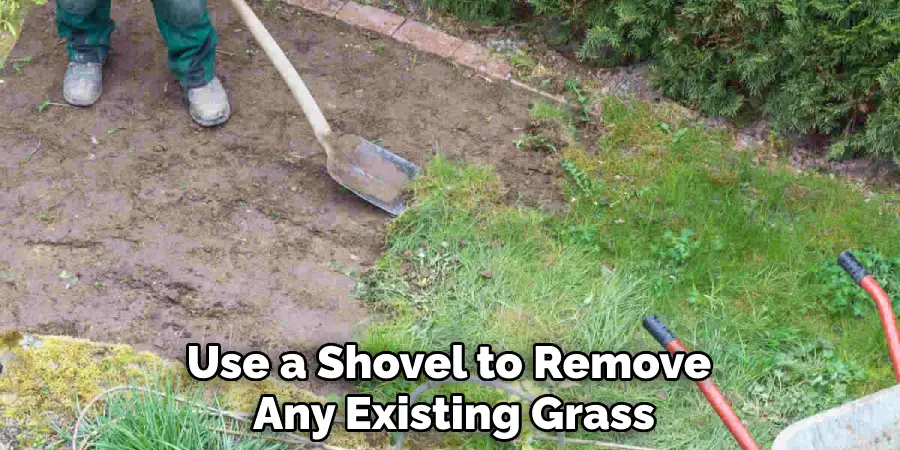
Step 1: Prepare the Area
Before you begin laying your pavers, it is important to properly prepare the ground. Use a shovel to remove any existing grass or weeds, and then use a level to ensure that the ground is even.
To start your paver installation project, it is essential to get the groundwork ready. Before anything can begin, use a shovel to clear away any existing vegetation such as grass and weeds. That way, your pavers will have a clean surface to stay on top of. Secondly, and equally important, you’ll need to make sure the ground is leveled.
Use a level tool and make any necessary adjustments for the pavers to fit securely around the pool’s perimeter – the more even the surface, the better it’ll be for both your project’s aesthetics and its structural integrity down the line.
Preparing the area correctly not only makes things easier when you start laying your pavers, but it also means that your handiwork will be able to withstand time and weather conditions well into the future.
Step 2: Install Landscape Fabric
Once the area has been prepped, it’s time to install landscape fabric. This is an important step as it will help prevent any weeds or grass from growing through the pavers, ultimately extending the life of your patio.
Installing landscape fabric is a critical step before laying down pavers for long-lasting results. Landscape fabric serves as a great barrier to weeds and other vegetation that would otherwise quickly thrive in the near environment, disturbing your beautiful pool patio in no time.
Having landscape fabric automatically makes maintenance easier and less frequent, granting you more time to enjoy yourself with family and friends. Follow the guidelines that come with the particular fabric to make sure it is properly installed and secured.
With proper installation of landscape fabric, you can rest assured that your beautiful pool patio will remain to look good for many years!
Step 3: Add Sand and Level it Out
After you have installed the landscape fabric, add a layer of sand that’s about 2-3 inches thick. Use a rake to level it out and make sure there are no lumps or bumps.

Adding the right layer of sand around a pool is an important step to ensure your pavers lay evenly and look great. Start by adding a 2-3 inch layer of sand, then use a rake to spread it accurately so there are no lumps or bumps.
Once the sand is evenly distributed, you can start laying your pavers in whatever design you’ve chosen. When designing with pavers, take into consideration the color of your pavement, as well as how it will interact with any other materials nearby for the most attractive result.
Finally, be sure to compact and seal your pavers after installation for maximum durability and to keep them from shifting or cracking over time.
Step 4: Lay the Pavers
Begin laying your pavers in a specific pattern, making sure that each one is firmly placed on top of the sand. It’s best to use a rubber mallet to ensure that they are adequately secured.
Laying pavers around your pool ensures that the surface is both safe and attractive. Begin by picking out a pattern such as a basket weave or herringbone design, then start laying the pavers in that pattern. It’s wise to use a rubber mallet for each stone to ensure that it’s firmly planted and level.
Be sure to check with a spirit level as you go along to make sure the ground is even. Once complete, you’ll have an inviting poolside area to enjoy with friends and family all summer long.
Step 5: Fill in the Gaps
After all of your pavers have been laid, fill up any remaining gaps with sand or fine gravel. This will help keep everything firmly in place and prevent weeds from growing through the cracks.
After finishing laying all your pavers around the pool, fill any remaining gaps with either sand or fine gravel. Maintaining the gaps with sand or gravel helps create interlocking support between each paver and prevents weeds from growing through them.
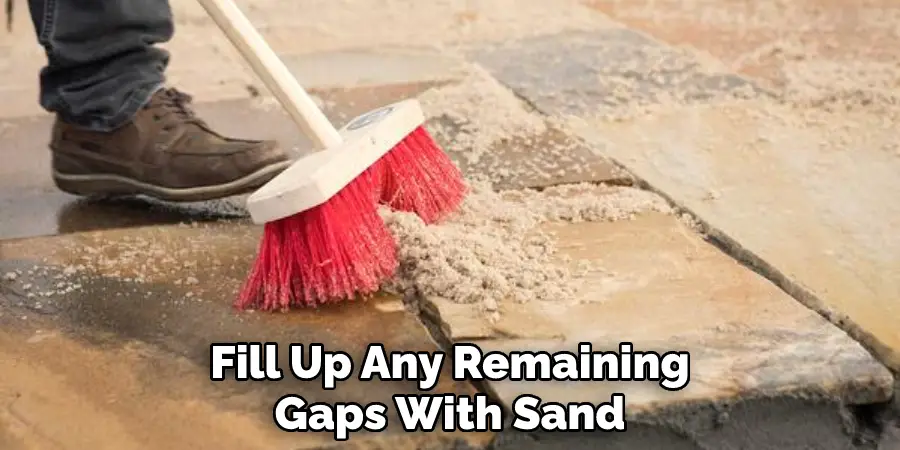
It also helps stop the pavers from shifting around with use and time, thus preserving their integrity and aesthetic beauty for longer. To finish up, you should activate the joints by gently brushing the sand or fine gravel until it is level with adjacent pavers to complete your project successfully.
Step 6: Seal the Pavers
Finally, to protect your new patio area, be sure to seal the pavers. This will help extend its life and keep it looking beautiful for years to come.
Sealing your pavers is an important step for extending the lifespan of your patio, and preserving its aesthetic beauty. There are a variety of sealers available, from water-based to solvent-based varieties.
Water-based sealers protect without changing the color or texture of the paper, but require more applications over time. Solvent-based sealers provide lasting protection with fewer applications, and they also enhance colors or textures, however, they may slightly darken unsealed pavers.
Be sure to do research on the best product for you before making any purchases and be sure to follow the manufacturer’s instructions closely when applying!
And that’s all there is to it! Following these simple steps will have you laying pavers around your pool in no time at all! But if you’re feeling particularly bold, why not mix up the patterns or add some extra features, like stepping stones or even a fire pit?
Whatever you decide to do, laying pavers around your pool will add both style and function to your outdoor space. So why wait? Get started today!
Tips to Lay Pavers Around a Pool
- The first step in successfully installing pavers around a pool is to choose the right type of pavers. There are many different types of pavers available on the market, so it is important to do some research to find the best option for your needs. Some factors that you should consider when choosing pavers include the material, color, and size.
- Once you have chosen the right pavers, you will need to prepare the area where they will be installed. This includes clearing away any existing vegetation, leveling the ground, and compacting the soil. It is also important to make sure that the area is large enough to accommodate the pavers you have chosen.
- After preparing the area, you will need to install a base layer before laying the pavers. The base layer helps to support the pavers and prevent them from shifting or settling over time. A common material used for a base layer is gravel, but you can also use sand or concrete mix.
- Once the base layer has been installed, you can begin laying the pavers. It is important to start at one end and work your way toward the other in a straight line. When laying the pavers, be sure to tap them into place with a rubber mallet so that they are level with each other.
- After all of the pavers have been laid, you will need to fill in any joints between them with sand or another filler material. This helps to prevent weeds from growing between the pavers and keeps them from shifting out of place over time.
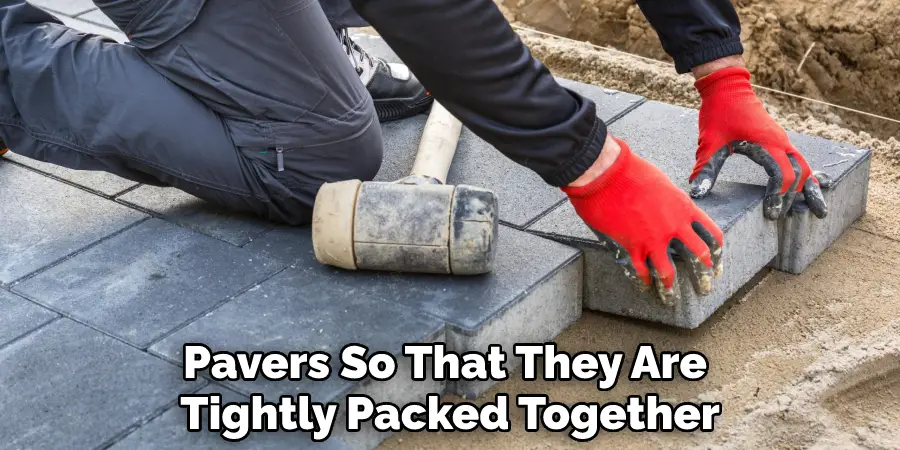
- Once all of the joints have been filled, you will need to compact the pavers so that they are tightly packed together. This can be done with a hand tamper or a plate compactor. Be sure to compact evenly across all of the pavers to avoid creating any weak spots.
- To help keep your new paver patio looking neat and tidy, it is a good idea to add edging around it. You can use metal edging, plastic edging, or even bricks or stones as long as they are level with the top of your pavers. Be sure to secure any edging materials in place so that they do not shift over time.
- After your edging has been installed, you can finish up by adding any desired finishing touches such as landscaping fabric or mulch around your patio.
The Ultimate Guide To Laying Pavers Around Your Swimming Pool
Deciding to install pavers around your pool is a big decision that takes careful consideration and planning. For the novice DIYer or contractor, there are several preparations to take before you can begin installing the pavers, which vary depending on the type of paver being used.
Start with cleaning up obstacles – like removing grass, weeds, and rocks – as well as excavating the area where you plan to lay down the pavers. Then consider drainage before deciding on an appropriate type of sand for leveling things out.
After that, it’s time to lay down the pavement in whatever pattern suits your style best! Depending on all these factors plus choosing quality materials, laying pavers around your pool can seem like a daunting task but a successful project is ultimately rewarding!
How to Create a Patio That Lasts?
Creating a patio that will last for years takes more than just the design and installation. Quality materials play an important role in ensuring your patio remains strong and stable throughout its lifespan. Stone, pavers, and composite materials like Trex are all good options that resist fading from weathering, rot from moisture, and staining from mildew.
Another essential step is to correctly prepare the subbase which provides a solid anchor for your patio. Consider consulting with an experienced landscaper or professional engineer so your sub-base can be created properly to ensure stability for years to come.
Finally, regular maintenance such as weeding, cleaning, sweeping dirt or leaves, and sealing porous materials like brick or natural stone are all necessary steps to extend the life of your patio.
Taking the proper precautions during construction and maintenance will help you create a lasting outdoor space that friends and family can enjoy for many summers to come.
Conclusion
By following these steps, you can lay pavers around your pool with ease. You should carefully determine how to lay pavers around a pool.
With a little bit of time and patience, you will have a beautiful patio that everyone will be able to enjoy.
Be sure to take your time and measure twice before cutting so that everything fits perfectly. Have fun and enjoy the process!
You Can Check It Out to Attach Rope Lights to Above Ground Pool
About
Outdoor Fixes is a distinguished figure in the world of Diy design, with a decade of expertise creating innovative and sustainable Diy solutions.
His professional focus lies in merging traditional craftsmanship with modern manufacturing techniques,
fostering designs that are both practical and environmentally conscious. As the author of diy,
outdoorfixes delves into the art and science of outdoorfixes-making, inspiring artisans and industry professionals alike.
Education RMIT University
(Melbourne, Australia) Associate Degree in Design (Outdoor Fixes) Focus on sustainable design, industry-driven projects,
and practical craftsmanship. Gained hands-on experience with traditional and digital manufacturing tools, such as CAD and CNC software.
Nottingham Trent University
(United Kingdom) Bachelor’s in outdoorfixes.com and Product Design (Honors) Specialized in product design with a focus on blending creativity with production
techniques. Participated in industry projects, working with companies like John Lewis and Vitsoe to gain real-world insights.
Publications and Impact
In diy, Outdoor Fixes his insights on indoor design processes, materials, and strategies for efficient production.
His writing bridges the gap between artisan knowledge and modern industry needs, making it a must-read for both budding designers and seasoned professionals.