
A lush, green lawn is the pride of many homeowners, but achieving it often involves more than just regular mowing. The endless cycle of bagging and disposing of grass clippings can be a chore, and it removes valuable nutrients from your yard. Mulching blades offer a smarter, more sustainable solution. These specially designed blades have curved surfaces and extra cutting edges that slice grass clippings into tiny, almost invisible particles. Instead of being collected, these particles fall back into the turf, where they decompose quickly, returning nitrogen and moisture to the soil. This process, known as grasscycling, acts as a natural fertilizer, promoting a healthier, more resilient lawn.
While the benefits are clear, the thought of changing a mower blade can be intimidating. This guide is here to show you just how to install mulching blades safely and correctly, transforming your standard mower into a powerful lawn-feeding machine.
Mulching blades are an excellent way to enhance your lawn care routine without the need for additional chemicals or fertilizers. By finely cutting grass clippings, these blades allow nutrients to return to the soil, saving time and money while benefiting the environment.
Before you begin, it’s important to understand the steps involved and take proper safety precautions to ensure a smooth installation process.

Installing Mulching Blades
Before you begin the installation process, it’s important to make sure you have the right tools and equipment. You will need:
- A set of mulching blades
- Work gloves
- Safety glasses
- A socket wrench or impact wrench
- Jack stands (if using a riding mower)
Why Use Mulching Blades?
Mulching blades offer several advantages for maintaining a healthy and aesthetically pleasing lawn. By finely chopping grass clippings, they allow the clippings to decompose quickly, returning valuable nutrients like nitrogen back into the soil.
This process can reduce the need for chemical fertilizers, promoting a more sustainable and eco-friendly lawn care routine.
Mulching also helps retain soil moisture, which can be particularly beneficial during dry periods, and prevents thatch buildup by breaking down clippings efficiently. Overall, mulching blades provide a simple yet effective way to improve the health of your lawn while saving time and resources.
Benefits of Mulching Blades
There are numerous benefits to using mulching blades for your lawn care routine. Some of the key advantages include:
- Reduced need for chemical fertilizers: As mentioned earlier, mulching helps return valuable nutrients back into the soil, reducing the need for additional chemical fertilizers. This not only saves money but also promotes a more eco-friendly approach to lawn care.
- Healthier grass growth: Mulching blades help chop up grass clippings into fine pieces that are then distributed evenly across the lawn. These clippings act as natural fertilizer, providing essential nutrients like nitrogen and phosphorus to help promote healthier grass growth.
- Time-saving and convenient: Using a mulching mower eliminates the need to stop and empty a grass catcher or dispose of clippings, saving you time and effort during lawn mowing. This also means less trips to the compost pile or yard waste container, making it a more convenient option.
- Easy maintenance: Mulching blades require minimal maintenance compared to regular blades. Since they do not have sharp edges like traditional blades, sharpening is not necessary. They also do not need to be changed out as frequently, making them an easier and more cost-effective choice.

Step-by-Step Guide on How to Install Mulching Blades
Step 1: Gather the Right Tools and Safety Gear
Before you even think about approaching the mower, the first and most crucial step is to prepare your workspace and assemble the necessary equipment. Your safety is the top priority in any maintenance task involving sharp objects and heavy machinery.
You will need a pair of thick work gloves, preferably leather or a heavy-duty synthetic, to protect your hands from the sharp edges of both the old and new blades. You will also need safety glasses to shield your eyes from any falling debris or rust flakes.
For the tools, locate a socket wrench set with an extension bar; the exact socket size will depend on your mower model, but it is typically between 1/2-inch and 3/4-inch. You will also need a blade removal tool or a simple block of wood (a 2×4 works perfectly) to secure the blade and prevent it from spinning while you loosen the bolt.
Finally, have a torque wrench on hand to ensure you can tighten the new blade to the manufacturer’s exact specifications, preventing it from coming loose during operation.
Step 2: Prepare the Mower for Maintenance
With your tools and safety gear ready, you can now prepare the lawn mower itself. First, ensure the mower is on a flat, level, and stable surface like a garage floor or driveway.
This prevents any unexpected rolling or tipping. The next, and most critical, safety procedure is to completely disable the engine to prevent any chance of an accidental startup while you are working.
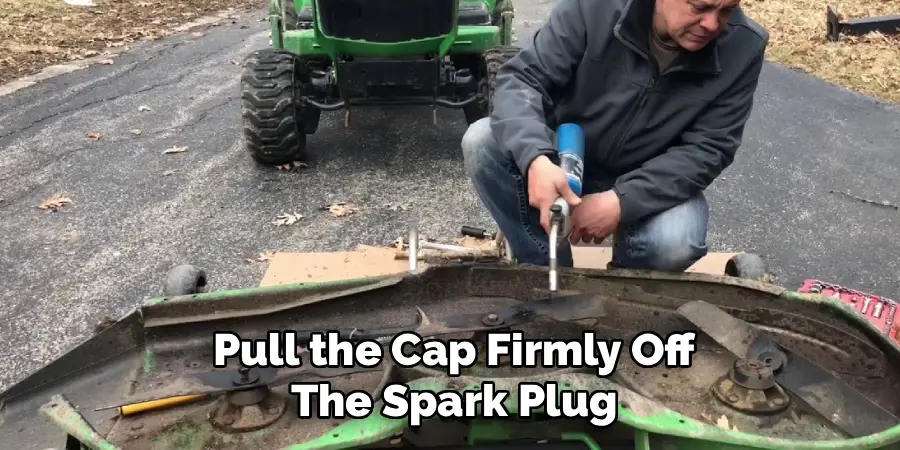
For a gasoline-powered mower, this means you must disconnect the spark plug wire. Simply locate the thick, rubber-coated wire connected to the front or side of the engine and pull the cap firmly off the spark plug tip. Tuck the wire away from the plug to ensure it cannot make contact.
If you are working with a battery-powered electric mower, the process is even simpler: just remove the battery pack from its housing. This single action of disabling the power source is the most important part of the entire process, creating a safe environment for the work ahead.
Step 3: Safely Tilt the Mower for Access
To reach the blade, you need to access the underside of the mower deck. The correct way to tilt your mower is critical to avoid damaging the engine or causing fuel and oil leaks. Never tip a gas mower onto its side with the air filter or carburetor facing down.
Doing so can cause oil and gas to flood these components, preventing the mower from starting later. The safest method is to tilt the mower backward, so it rests on its rear wheels with the handle on the ground. This keeps the engine fluids safely in their reservoirs.
Before tilting, check your fuel level; if the tank is full, it may be wise to run the mower for a few minutes or carefully siphon some fuel out to prevent spillage. For added stability, you can secure the handle with a heavy object. This rear-tilting position provides clear and safe access to the cutting deck and blade assembly for removal.
Step 4: Secure and Remove the Old Mower Blade
Now you can proceed with removing the existing blade. Position your blade removal tool against the side of the mower deck to lock the blade in place. If you are using a block of wood, wedge it firmly between the end of the blade and the inner wall of the deck to stop any rotation.
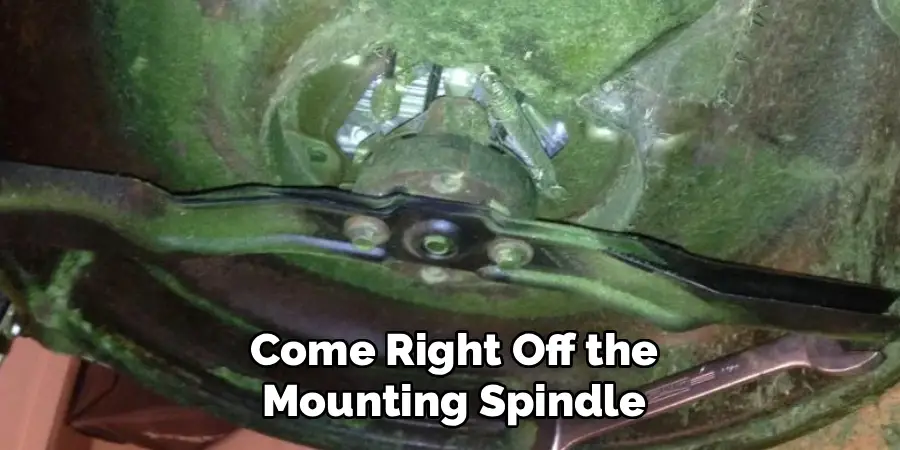
With the blade secured, fit the correct socket onto your wrench, place it over the central retaining bolt (or nut), and turn it counter-clockwise to loosen. Remember the old rule: “righty-tighty, lefty-loosey.” These bolts are often on very tight, so you may need to apply significant, steady force. Once the bolt breaks free, you can unthread it the rest of the way.
Carefully remove the bolt and any accompanying washers, paying close attention to their order and orientation. Once the hardware is off, the old blade will come right off the mounting spindle. Set everything aside in a way that helps you remember the reassembly order.
Step 5: Clean the Deck Underside
With the old blade removed, you have a perfect opportunity to perform some essential maintenance. The underside of the mower deck is likely caked with a thick layer of dried grass, mud, and other debris.
This buildup can impede airflow, which is critical for the mulching process to work effectively. Use a putty knife or a wire brush to scrape away all the compacted grime from the inside of the deck.
Pay special attention to the areas around the spindle and the discharge chute. A clean, smooth deck surface creates a more efficient vortex of air, allowing the new mulching blades to lift and recut the grass clippings multiple times before they are discharged.
This step, while simple, dramatically improves the performance of your new blades and is an integral part of understanding how to install mulching blades for maximum effectiveness, not just for simple replacement.
Step 6: Mount the New Blade
It is now time to install your new mulching blade. Before mounting, take a moment to confirm you have the correct blade for your mower model. Check the length and the shape of the central mounting hole to ensure it matches the old blade.
Next, identify the correct orientation. Mower blades are not symmetrical; one side is the “grass side” and the other is the “deck side.” The “deck side” is usually marked with “This Side Toward Deck” or a part number.
The cutting edges, which are the sharpened portions of the blade, must be pointing up toward the deck in the direction of the blade’s rotation (typically clockwise).
Carefully align the central hole of the new blade with the mower’s spindle and slide it into place, ensuring it sits flush and stable. Misinstalling a blade upside down is a common mistake that will result in tearing, not cutting, the grass, so double-checking the orientation is paramount.
Step 7: Securely Tighten and Torque the Blade
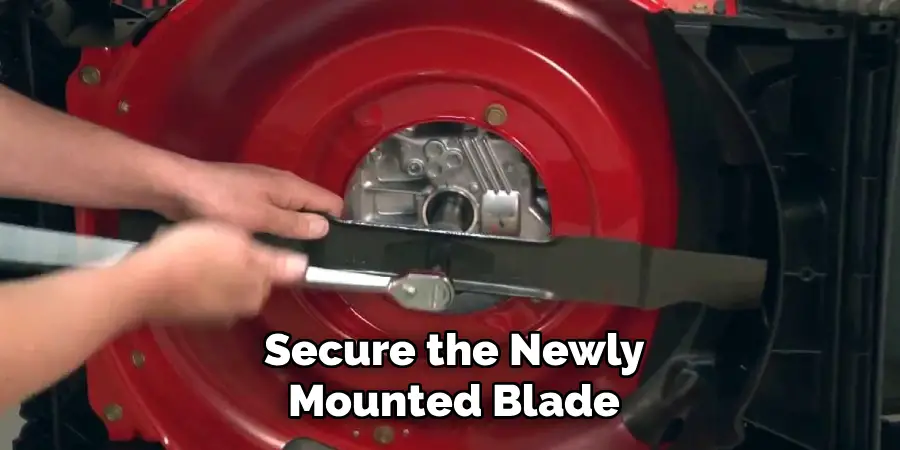
The final step is to secure the newly mounted blade correctly. This is not a task to be rushed. Place the washers and the bolt back onto the spindle in the exact same order you removed them.
Hand-tighten the bolt until it is snug. Now, secure the new blade with your block of wood or blade removal tool, just as you did during removal. Using your torque wrench, tighten the bolt clockwise to the specific torque value recommended in your lawn mower’s owner’s manual. This specification is crucial; over-tightening can strip the bolt or damage the spindle, while under-tightening can allow the blade to become dangerously loose during operation.
If you do not have a torque wrench, use your socket wrench to tighten the bolt as firmly as you possibly can. Once tightened, give the blade a final check to ensure it is secure and balanced. You can now carefully lower the mower, re-attach the spark plug wire or battery, and prepare for a test run.
Safety Tips for Installation
- Ensure the Power Source is Disconnected
Before beginning any maintenance or installation, always disconnect the spark plug wire or remove the battery to prevent accidental starts. - Wear Protective Gear
Use gloves to protect your hands from sharp edges and safety glasses to shield your eyes from debris. - Work on a Stable Surface
Always place the mower on a flat and stable surface to prevent tipping during installation. - Use the Correct Tools
Ensure you are using the proper tools, such as a socket wrench or torque wrench, to avoid damaging bolts or other parts of the mower. - Inspect the Blade and Hardware
Before installation, check the blade and bolts for damage or excessive wear. Replace any defective parts to ensure safe operation. - Follow the Manufacturer’s Instructions
Always refer to the owner’s manual for specific guidance and torque specifications to ensure proper installation.
By adhering to these safety tips, you can reduce the risk of injury and ensure your mower operates efficiently and safely.
Frequently Asked Questions
Are Mulching Blades and Regular Blades Interchangeable?
Yes, in most cases, you can replace a standard “2-in-1” (bagging and side-discharge) blade with a “3-in-1” mulching blade on the same mower, provided it is the correct length and has the right mounting hole pattern for your specific model. The key difference is the blade’s shape.
Mulching blades have a more curved profile and additional cutting surfaces designed to keep clippings airborne longer for finer chopping. Always verify compatibility with your mower’s user manual before purchasing.
Do I Need a Mulching Kit to Use Mulching Blades?
While you can often use mulching blades without a full kit, a dedicated mulching kit will significantly improve performance. These kits typically include a “mulch plug,” which is a piece of plastic that blocks the side discharge opening on your mower deck.
By sealing this exit, the kit ensures that grass clippings are trapped under the deck, allowing the blade to recut them multiple times into finer pieces before they drop into the lawn.
How Do I Know If My Mulching Blade Is on Upside Down?
A blade installed upside down will not cut the grass; it will tear and shred it, leaving your lawn looking ragged and unhealthy. The easiest way to check is to look at the cutting edges.
The sharpened part of the blade should always be pointing upwards, towards the mower deck, following the direction of rotation. Most blades are also stamped with text like “This Side Down” or “Grass Side” to prevent this common installation error.
How Often Should I Sharpen My Mulching Blades?
For the average homeowner mowing once a week during the growing season, it is a good practice to sharpen your mulching blades at least once or twice a year. A good rule of thumb is to check them after every 25 hours of use.
Running into rocks, roots, or thick debris will dull them much faster. A sharp blade provides a clean cut, which is healthier for the grass and puts less strain on your mower’s engine.
What Is the Difference Between Gator Blades and Mulching Blades?
“Gator blade” is a popular brand name for a specific type of high-performance mulching blade. While all Gator blades are mulching blades, not all mulching blades are Gator blades. Gator blades are distinguished by their high-lift, serrated “teeth” on the trailing edge of the blade.
This design is engineered to create a more powerful updraft and provide more aggressive shredding action, resulting in exceptionally fine clippings, especially in tougher or wetter conditions.
Conclusion
Upgrading to mulching blades is one of the most impactful and beneficial maintenance tasks you can perform for your lawn mower and your yard. The process, while seemingly technical, is straightforward and safe when you follow a clear set of procedures.
By taking the proper safety precautions, using the right tools, and carefully following each step from disconnecting the spark plug to torquing the final bolt, you can confidently perform this upgrade yourself.
The reward for your effort is a healthier, naturally fertilized lawn and the elimination of the weekly chore of bagging grass clippings. You now have a comprehensive understanding of the entire process.
Armed with this knowledge, you are fully prepared to tackle the project and learn how to install mulching blades, unlocking a more efficient and eco-friendly approach to lawn care.
About
Outdoor Fixes is a distinguished figure in the world of Diy design, with a decade of expertise creating innovative and sustainable Diy solutions.
His professional focus lies in merging traditional craftsmanship with modern manufacturing techniques,
fostering designs that are both practical and environmentally conscious. As the author of diy,
outdoorfixes delves into the art and science of outdoorfixes-making, inspiring artisans and industry professionals alike.
Education RMIT University
(Melbourne, Australia) Associate Degree in Design (Outdoor Fixes) Focus on sustainable design, industry-driven projects,
and practical craftsmanship. Gained hands-on experience with traditional and digital manufacturing tools, such as CAD and CNC software.
Nottingham Trent University
(United Kingdom) Bachelor’s in outdoorfixes.com and Product Design (Honors) Specialized in product design with a focus on blending creativity with production
techniques. Participated in industry projects, working with companies like John Lewis and Vitsoe to gain real-world insights.
Publications and Impact
In diy, Outdoor Fixes his insights on indoor design processes, materials, and strategies for efficient production.
His writing bridges the gap between artisan knowledge and modern industry needs, making it a must-read for both budding designers and seasoned professionals.