
Are you looking for an easy and cost-effective way to install a chicken wire fence with T-posts? If so, then this blog post is perfect for you! In the following article on how to brace a fence corner post, we will be covering everything that you need to know in order to successfully install your own chicken wire fence with T-posts.
We will discuss what type of T-posts to use, the tools needed for installation, step-by-step instructions on how to set up the posts and attach fencing material in between them, and even how to customize it as a protective barrier around your backyard space.

Regardless of whether this is the first time setting How to Install Chicken Wire Fence With T-posts or not – we are here to help make sure you understand every aspect of this task!
12 Step-by-step Guidelines on How to Install Chicken Wire Fence With T-posts
Step 1: Gather Materials
Before starting the installation process, make sure you have all the necessary materials on hand. This includes T-posts, chicken wire fencing material, fence clips or staples, pliers or a hammer, and any other tools you may need. It is also important to ensure that you have enough fencing material to cover the entire perimeter of your desired area.
Step 2: Determine Post Placement
Start by mapping out where you want your fence posts to be placed. This will depend on the size and shape of your desired area. Generally, T-posts should be spaced no more than 8 feet apart, but this can vary based on personal preference.
You can use a measuring tape or simply eyeball the spacing. It is also important to keep in mind that your fence line should be straight and not have any sharp angles.
Step 3: Dig Holes
Using a post hole digger or shovel, dig holes that are approximately 2 feet deep for each post. This will provide enough stability for the posts once they are set in place.
It is important to make sure that the holes are evenly spaced and aligned with your desired fence line. This may require some extra measurements and adjustments. You can also use a string or rope to help guide you in keeping your fence line straight.
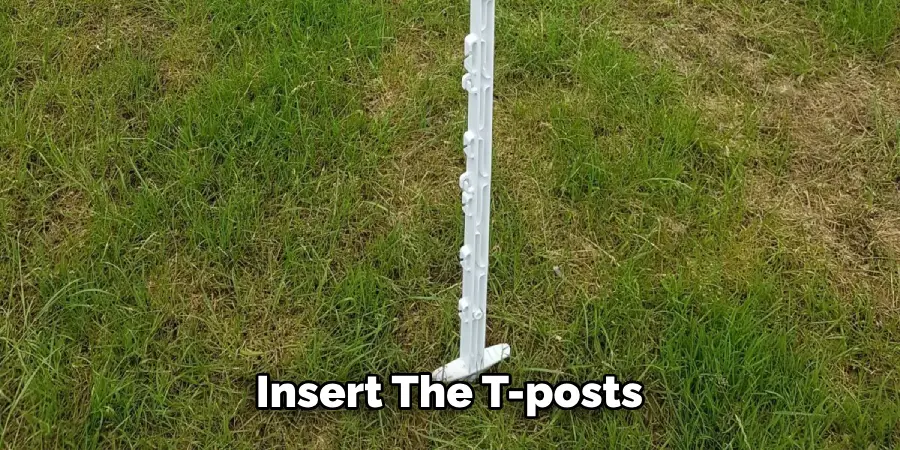
Step 4: Insert T-posts
Once the holes are dug, carefully insert the T-posts into them. Make sure they are standing upright and firmly in place. It may be helpful to have someone hold the post while you fill in the hole with dirt.
It is important to pack the dirt tightly around the post to provide stability. But be careful not to pack it too tightly as this can cause the post to bend. You can also use a level to ensure that the post is straight.
Step 5: Brace Posts
In order to ensure stability, it is important to brace the posts on either side of a corner post. This can be done by attaching a horizontal wooden board between the two posts using fence clips or staples.
It is recommended to use a board that is at least 2 inches thick and 6 feet long. This will help prevent the posts from leaning or shifting. You can also use a diagonal brace for added support. It is important to repeat this process for all corner posts and any additional posts along the fence line.
Step 6: Secure Posts
Use pliers or a hammer to secure the posts in place by bending any excess wire at the bottom of the T-post and wrapping it around itself. This will prevent the posts from moving and add additional stability.
You can also use fence clips or staples to attach the fencing material to the posts. Make sure to space them evenly and securely fasten them. It is important to do this on both sides of the fence line.
Step 7: Unroll the Fencing Material
Unroll your chicken wire fencing material along the perimeter, making sure it is parallel to the T-posts. It is important to have at least an extra foot of material on each end for securing and cutting.
You may need to use multiple rolls of fencing material depending on the size of your desired area. It is also recommended to overlap the ends of each roll by a few inches for added stability. It is important to make sure the bottom of the fencing material is flush with the ground.
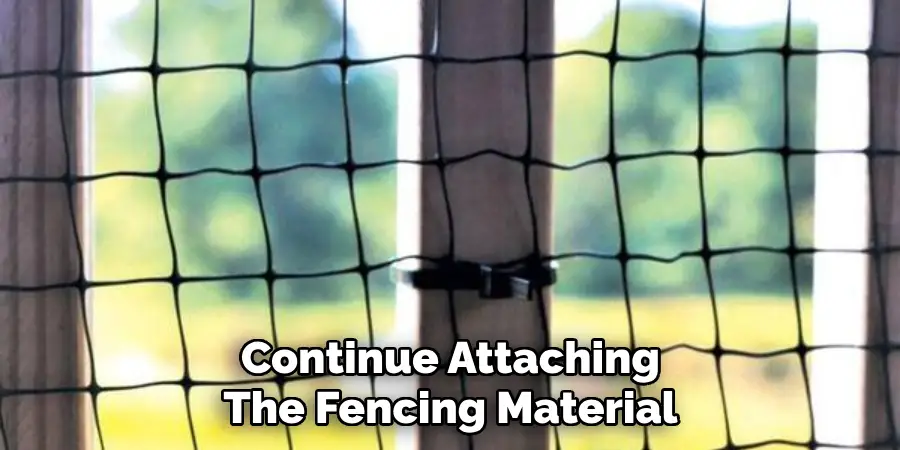
Step 8: Attach Fencing Material
Using fence clips or staples, attach the fencing material to the first T-post. Make sure it is pulled taut before securing it in place. This will help prevent any sagging or gaps in the fencing.
Continue this process along the entire perimeter, making sure to securely attach the material to each post. You may also want to consider adding a top rail for added stability and support. It is important to also securely fasten the fencing material at the ends and corners where it meets.
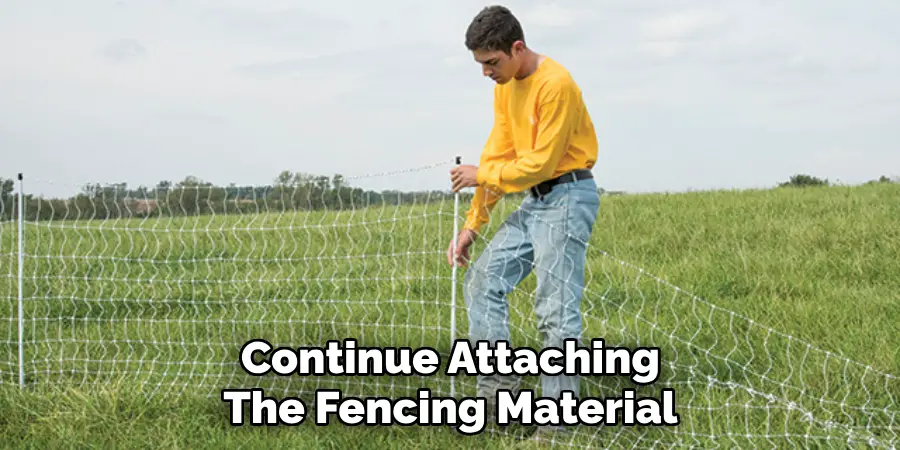
Step 9: Continue Attaching Fencing Material
Continue attaching the fencing material along the perimeter, making sure it is pulled taut and secured to each T-post as you go. But be careful not to pull too tightly, as this can cause the posts to bend.
You may need to use pliers or a hammer to ensure the fencing material is securely attached. It is also recommended to add vertical support wires every 6-8 feet for added stability.
Step 10: Cut Excess Material
Once you have reached the last T-post, cut any excess fencing material using wire cutters. It is important to leave at least an extra foot for securing and overlapping. You can also use the excess material to reinforce any weak spots or areas that may need additional support. It is important to make sure all ends are securely fastened and that there are no gaps in the fencing.
Step 11: Secure Final Post
Using pliers or a hammer, secure the final T-post in place by bending and wrapping any excess wire at the bottom of the post. Always make sure the post is straight and firmly in place. You can also use fence clips or staples to attach the fencing material to the post. You may also want to consider adding a horizontal board at the top for added stability.
Following these steps on how to brace a fence corner post, you should now have a fully installed chicken wire fence with T-posts. However, if you want to add some personal touches and make it more aesthetically pleasing, keep reading for some additional tips!
Customization Tips
- Paint the Posts and Fencing Material a Desired Color
- Use Decorative Post Caps to Add Some Flair
- Add Wooden Stakes on Either Side of the Corner Posts for Extra Support and Visual Appeal
- Plant Climbing Vines Along the Fence for a Natural and Beautiful Touch
- Use Colored Zip Ties to Secure the Fencing Material Instead of Traditional Fence Clips or Staples
With these tips, you can take your simple chicken wire fence with T-posts and turn it into a visually appealing addition to your yard. Now go out there and install your own chicken wire fence – you’ve got this! So, it is not really over yet; we have just completed the basic installation process.
However, to ensure that your fence stands strong for years to come, make sure to regularly inspect and maintain it. This includes checking for any loose posts or fencing material and repairing them when necessary.
Frequently Asked Questions
Q1. How Much Chicken Wire Fencing Material Do I Need?
A1. The amount of material needed will depend on the perimeter of your desired area, as well as the height of your fence. Measure the length and height, and then calculate how many rolls of fencing material you will need to cover it. It is always good to get a little extra, just in case.
Q2. Can I Use T-posts for Other Types of Fencing?
A2. Yes, T-posts can be used for other types of fencing such as deer netting or chain link fences. Just make sure the posts are properly braced and secure enough to support the weight of the fencing material. But remember, chicken wire fencing is specifically designed for use with T-posts.
Q3. How Deep Should I Dig My Post Holes?
A3. The depth of your post holes will depend on the type of soil in your area and the height of your fence. As a general rule, holes should be at least 2 feet deep, but it is always best to refer to your local building codes for specific guidelines.

Q4. Do I Need to Use Fence Clips or Staples?
A4. Yes, fence clips or staples are necessary to securely attach the fencing material to the T-posts. These can also help with keeping the fencing material pulled taut.
Conclusion
In conclusion, installing a chicken wire fence with T-posts is a great way to ensure the safety and security of your property. It’s a relatively easy project for DIYers and only requires basic tools. Not to mention, it’s also cost-effective and can be done in just a few hours with minimal parts needed. Don’t forget to turn off the power before you start working on the fence.
Ensure that each post is firmly set in place by using a post-hole digger or driving the T into the ground using a stabber tool. After it’s securely in place, attach your chicken wire rolls to it, tying them periodically for additional support if needed.
No matter what type of fence you choose, knowing how to install one can make all the difference when it comes to protecting your property and keeping out those pesky predators from getting into your yard. So don’t wait any longer – get out there and start building that fence today! Thanks for reading this article on how to brace a fence corner post.
About
Outdoor Fixes is a distinguished figure in the world of Diy design, with a decade of expertise creating innovative and sustainable Diy solutions.
His professional focus lies in merging traditional craftsmanship with modern manufacturing techniques,
fostering designs that are both practical and environmentally conscious. As the author of diy,
outdoorfixes delves into the art and science of outdoorfixes-making, inspiring artisans and industry professionals alike.
Education RMIT University
(Melbourne, Australia) Associate Degree in Design (Outdoor Fixes) Focus on sustainable design, industry-driven projects,
and practical craftsmanship. Gained hands-on experience with traditional and digital manufacturing tools, such as CAD and CNC software.
Nottingham Trent University
(United Kingdom) Bachelor’s in outdoorfixes.com and Product Design (Honors) Specialized in product design with a focus on blending creativity with production
techniques. Participated in industry projects, working with companies like John Lewis and Vitsoe to gain real-world insights.
Publications and Impact
In diy, Outdoor Fixes his insights on indoor design processes, materials, and strategies for efficient production.
His writing bridges the gap between artisan knowledge and modern industry needs, making it a must-read for both budding designers and seasoned professionals.