TL;DR: If you want a concrete porch to look better, start with the basics: clean it well, patch cracks, and use a finish made for masonry, such as a concrete stain or porch paint. After that, the visual difference usually comes from the extras—an outdoor rug, a few planters, and decor that makes the space feel lived in rather than neglected.
A plain concrete porch has a way of making the whole front of a house feel tired. It does not matter if the siding is freshly painted or the landscaping is neat; if the entry is stained, cracked, or faded, people notice. Many homeowners assume replacement is the only real fix. In some cases, maybe it is. But often, especially when the slab is basically sound, a full tear-out is unnecessary.
That is the good news. A front porch or small patio can often be improved over a weekend with a manageable set of tools and some patience. The work is not glamorous, admittedly. You clean, patch, wait for things to dry, then wait again. Still, done carefully, the result can shift the feel of the entryway quite a bit. What starts as a dull gray slab may end up looking intentional, clean, and far more welcoming. In this guide on how to make concrete porch look better, we will discuss the steps you need to take to improve the appearance of your concrete porch.

Assess the Condition of the Porch
Before you buy paint, stain, or decorative pots, take a close look at the concrete itself. Not a quick glance—a real inspection. Check for deeper cracks, crumbling edges, flaking spots, and low areas where water tends to sit after rain. Small hairline cracks are common and, in most cases, fairly easy to deal with using off-the-shelf repair materials. Wider cracks or sections that appear uneven may point to movement underneath the slab, which is a different issue altogether.
This step matters more than people like to admit. Cosmetic upgrades can look great for a season, then start failing if the surface underneath was never stable to begin with. A porch that holds moisture, shifts in winter, or sheds old material will not suddenly behave because it has been painted. So yes, assess first. It is less exciting than choosing colors, but it may save you from doing the entire job twice.
7 Simple Step-By-Step Guidelines on How to Make Concrete Porch Look Better
Step 1: Deep Clean the Concrete Surface
Every decent concrete refresh begins with cleaning. Really cleaning. That means removing the layer of dirt, mildew, old residue, and loose paint that has probably built up over the years. Start with a broom and clear off leaves, dust, and cobwebs. After that, use a pressure washer—ideally one strong enough to handle concrete effectively. Around 2,500 PSI is often suggested for this kind of job, and for many porches, that is enough to lift grime a garden hose will barely disturb.
Some stains need more than water. Grease marks, for example, may require a masonry degreaser and a stiff brush. Scrub those areas directly instead of hoping the washer will do everything for you. It usually will not.
Then comes the least satisfying part: waiting. Concrete holds moisture longer than it looks like it should, and painting over damp pores is one of the fastest ways to end up with bubbling or peeling later. Give the porch ample time to dry—often at least 48 hours of clear weather. If the air is humid or the slab is shaded, more time may be wise. This is one of those moments when impatience tends to show up in the final result.
Step 2: Repair Cracks and Imperfections
Once the porch is clean and fully dry, turn your attention to the damage that makes it look worn out in the first place. Cracks, chips, broken corners, pitted spots—none of those disappear under paint as neatly as product labels sometimes imply. Small fissures can usually be filled with a flexible concrete patching compound. Press it in firmly with a putty knife so it reaches below the surface rather than just skimming across the top.
Try to smooth the repair while it is still workable. The closer it matches the surrounding slab now, the less obvious it will be later. Larger voids or broken stair edges may call for a fast-setting cement repair mix instead of a lighter patch compound. Those repairs tend to set quickly, so it helps to work in small sections and shape them before they harden.
After everything cures, sand or abrade the patched areas enough to reduce ridges and sharp transitions. You are not aiming for perfection. Concrete is rarely perfect. You are aiming for a surface that looks consistent enough that the finish coat will not draw attention to every repair.
Step 3: Etch the Concrete for Better Adhesion
Here is the part many people skip and then regret later. Concrete can seem rough underfoot, but in coating terms, it may still be too smooth—or too dense—for paint or stain to grip well. Etching helps create a slightly more receptive surface. Depending on the product system you are using, that may involve a commercial concrete etcher or a diluted muriatic acid solution.
This is not a casual step. Wear gloves, eye protection, and suitable respiratory protection, and follow the product instructions closely. If the label gives a process, follow that process rather than improvising.
When applied properly, the etching solution reacts with the surface and leaves it with a texture that feels more like fine sandpaper than polished cement. That extra tooth can make a real difference in how well primer or paint bonds. After the reaction phase, rinse thoroughly. Then rinse again if needed. Any residue left behind could interfere with the next layer. And once more, let the slab dry completely before moving on. Decorative coatings do not forgive moisture very often.
Step 4: Apply a Bonding Primer
Primer is not the exciting part of the job, which is probably why so many people try to rationalize skipping it. On concrete, that is usually a mistake. If you want the finish to last beyond the near term, an exterior masonry primer made for concrete is worth using.
Apply it with a roller suited to textured surfaces, and use a brush around edges, corners, and places where the roller cannot reach cleanly. The goal is not to flood the porch, just to cover it evenly. Too much product can create its own problems.
What the primer does, in practical terms, is fairly simple: it helps the finish coat stick more reliably and may reduce the chance that old discoloration shows through. It can also help even out absorption across patched and unpatched areas, which matters more than you might think. A repair spot often takes paint differently from the original slab. Primer helps narrow that gap.
Dry time matters to her,e too. Many products call for something like eight to twelve hours, though weather conditions can shift that. If the primer still feels tacky, wait. Painting over it too soon may trap moisture and weaken the bond you just worked to create.
Step 5: Paint, Stain, or Stencil the Floor
This is where the porch starts to look transformed instead of merely prepared. You have a few options, and the best one depends on the look you want. A porch and floor enamel gives a more uniform finish and tends to hide older discoloration and patchwork. A concrete stain, by contrast, usually allows more of the slab’s original texture to show through. That can look great, especially if the concrete is in decent condition and you do not mind a less polished appearance.
Apply paint or stain in thin, even coats. Thick coats may seem efficient, but they often dry poorly and wear unevenly. Work in a direction that lets you leave the porch without stepping back into the wet finish. It sounds obvious until you are halfway through and realize you painted yourself toward the front door.
If you want something more decorative, stenciling can add pattern without the cost of tile or a more extensive resurfacing system. Tape down the stencil, dab on the contrasting color lightly, and resist the urge to overload the sponge or brush. Too much paint tends to bleed under the edges. The effect is better when it is controlled. Usually, a second coat helps with color depth once the first has dried.
This stage changes the mood of the space more than any other. A slab that looked purely functional can start to feel designed, which is not the same thing.

Step 6: Seal the Finished Concrete
Once the finish coat is dry and cured as directed, seal it. This is the protective layer that helps all the earlier efforts hold up against rain, foot traffic, sun exposure, and general wear. Without it, even a good paint job may start to look tired sooner than expected.
Choose a masonry sealer that works with the coating you used and suits the look you want. A gloss finish gives more shine, sometimes almost too much, depending on the house. Matte tends to feel quieter and, to my eye, often more forgiving. Either can work. The key is even application. Roll it on steadily and watch for puddling, because thicker spots may dry cloudy or tacky.
One caution that matters: painted or sealed concrete can become slippery when wet. If the porch regularly gets rain or snow, an anti-slip additive in the top sealer coat may be a smart choice. It does alter the texture slightly, but safety generally wins that argument. After sealing, give the porch the full cure time—often around 72 hours—before putting furniture back or using it heavily. Not glamorous, again. Necessary, yes.
Step 7: Add Furniture and Decorative Accents
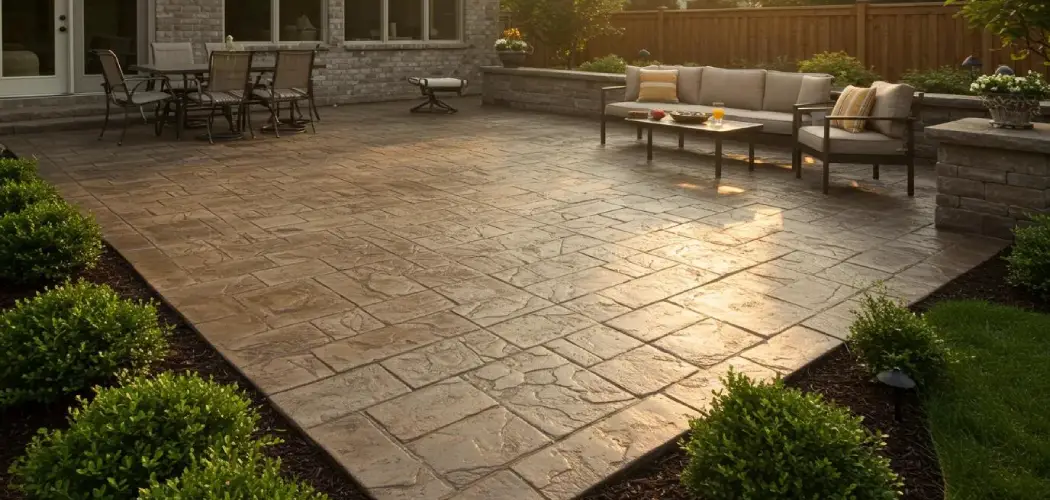
Once the surface work is finished, the porch still needs a little life. Otherwise, it risks looking newly painted but oddly empty. This is where decor does real work. A simple outdoor rug can soften the look of concrete immediately and help define the area, especially on a wider porch. A pair of weather-resistant chairs and a small table can make the space feel usable rather than purely decorative.
Pay attention to practical details here. Furniture legs can scratch a newly sealed floor, so pads or caps are worth adding. They are cheap, and they spare you the irritation of damaging the finish within the first week.
Plants help too—sometimes more than any paint color. Concrete can read as hard and cold, especially near entry steps. Terracotta pots, leafy ferns, or seasonal flowers break that up. Lighting has a similar effect. A wall lantern, pendant, or even simple string lights can make the porch feel more settled in the evening. None of this is strictly necessary. But it is often what makes the difference between an upgraded slab and an actually welcoming entrance. Following these steps on how to make concrete porch look better will transform your outdoor space and make it a place you’ll want to spend more time in.
Seasonal Decorating Ideas
One advantage of a refreshed porch is that it becomes easier to style through the year. In fall, pumpkins, potted mums, and even a weathered crate or two can frame the entry without much effort. Winter calls for different materials—an evergreen wreath, soft white lights, and a durable doormat that can handle wet shoes and tracked-in grit.
Spring and summer usually invite a lighter touch. Hanging baskets, bright cushions, and breathable seating fabrics can make the space feel open again after colder months. You do not need to overdecorate it. In fact, it often works against the porch, especially if the footprint is small. A few seasonal changes are usually enough to keep the space looking current.
Maintenance Tips for Long-Term Beauty
A finished concrete porch does not stay clean and intact on its own. The maintenance is not difficult, but it does need some consistency. Sweep it regularly so sand, leaves, and grit do not grind into the sealer underfoot. Wash it occasionally with mild soap and water or another cleaner that is safe for the finish you used. Strong acidic products can strip or dull certain coatings, so they are best avoided unless a manufacturer specifically recommends them.
Over time, the protective layer will wear down. Reapplying a clear masonry sealer every two to three years is often enough to keep the porch looking respectable and to reduce premature fading or scuffing. Heavy use, strong sun, or rough winters may shorten that timeline a bit.
Common Mistakes to Avoid
The most common mistake is also the most predictable: painting over concrete that is still dirty or still damp. That almost always leads to peeling. Another issue is skipping surface prep altogether, particularly etching or whatever bonding step the product system requires. Smooth concrete is not especially cooperative, and coatings tend to fail when they are asked to stick to a surface that was never prepared for them.
People also rush the cure times. Understandably. Home projects drag on, and waiting is tedious. Still, if one coat has not dried and you trap moisture under the next, the finish may soften, blister, or separate later. Using the wrong paint is another problem. Interior wall paint has no business on a porch floor. It might look acceptable for a minute, then deteriorate fast once the weather and foot traffic get involved.
Budget-Friendly Improvement Ideas
You do not need an enormous budget to improve a concrete porch in a noticeable way. If a premium coating system feels out of reach, a basic acrylic concrete stain may still provide a clear visual lift for relatively little money. It will not perform exactly like every higher-end product, of course, but cost matters, and not every porch needs the most expensive solution available.
Furniture can be handled the same way. An older chair or bench often looks perfectly good after sanding and a coat of exterior paint. Thrifted planters, secondhand side tables, and inexpensive perennial plants can all help fill out the space without making the project feel excessive. Done carefully, budget choices do not necessarily read as cheap. They just read as thoughtful.
Frequently Asked Questions
Can I Paint Over Old, Flaking Concrete Paint?
No, not if you want the new finish to last. Fresh paint will only adhere as well as the layer underneath it, and if that older coating is already peeling, the new one is likely to fail right along with it. Scrape, sand, or power-wash away loose material until you get back to a stable surface. It takes more effort upfront, but the alternative is doing the job again much sooner than you hoped.
How Long Does Painted Concrete Last Outdoors?
A painted concrete porch often lasts around three to five years when the surface is prepared properly and the coating was sealed and maintained. That is a general estimate, not a guarantee.
Areas that receive constant foot traffic—especially near the front door—may wear faster than the edges. Climate matters too. Freeze-thaw cycles, strong summer sun, and persistent moisture all tend to shorten the life of the finish. A fresh sealer coat every couple of years can help extend it.
What Is The Best Paint For An Outdoor Concrete Porch?
In many cases, an exterior masonry paint formulated for floors—often polyurethane-based or epoxy-fortified—is the strongest option. These products are made to handle movement in the concrete, changing temperatures, abrasion, and sun exposure better than ordinary latex or wall paint. The label matters here. Make sure it is approved for exterior horizontal surfaces, not just masonry in a general sense. That distinction can save you a lot of frustration later.
Transform Your Home’s Exterior Today
Improving a concrete porch is one of those projects that can make the front of a house feel noticeably more cared for without requiring a full renovation. Clean it properly, repair what needs repairing, use the right products, and the change can be significant. Not miraculous. But significant.
A worn, gray slab does not have to define the first impression of your home. With a little prep work, a free weekend, and a willingness to let each step dry before rushing into the next one, you can turn the porch into a space that feels finished, practical, and genuinely inviting. Thanks for reading this guide on how to make concrete porch look better.
About
Outdoor Fixes is a distinguished figure in the world of Diy design, with a decade of expertise creating innovative and sustainable Diy solutions.
His professional focus lies in merging traditional craftsmanship with modern manufacturing techniques,
fostering designs that are both practical and environmentally conscious. As the author of diy,
outdoorfixes delves into the art and science of outdoorfixes-making, inspiring artisans and industry professionals alike.
Education RMIT University
(Melbourne, Australia) Associate Degree in Design (Outdoor Fixes) Focus on sustainable design, industry-driven projects,
and practical craftsmanship. Gained hands-on experience with traditional and digital manufacturing tools, such as CAD and CNC software.
Nottingham Trent University
(United Kingdom) Bachelor’s in outdoorfixes.com and Product Design (Honors) Specialized in product design with a focus on blending creativity with production
techniques. Participated in industry projects, working with companies like John Lewis and Vitsoe to gain real-world insights.
Publications and Impact
In diy, Outdoor Fixes his insights on indoor design processes, materials, and strategies for efficient production.
His writing bridges the gap between artisan knowledge and modern industry needs, making it a must-read for both budding designers and seasoned professionals.