
Gardening is a great way to provide fresh, nutritious food for your family and a way of life that many have come to enjoy. But to ensure success in this activity, it’s important to stay on top of maintaining the health of the soil before, during, and after planting season. One important step along the way is integrating cover crops into a no-till garden system.
Cover crops can control erosion and reduce weed pressure while adding organic matter to the soil which helps improve its overall nutrient content over time—a key component in successful gardening year after year. In this blog post on how to use cover crops in a no till garden we’ll take you through how you can use cover crops in a no-till garden for the best results!
11 Step-by-step Instructions on How to Use Cover Crops in a No Till Garden
Step 1: Choose the Right Cover Crop
Some common options include clover, oats, alfalfa, hairy vetch, and buckwheat. It’s important to select the right cover crop for your location, soil type, and planting window. If you want to use the cover crop for mulch, then it’s important to select a species that breaks down quickly and provides good weed suppression. If soil fertility is the goal, then you will want to select a species that can fix nitrogen.
Step 2: Calculate Seeding Rates
Seeding rates vary by species, but generally, you should aim for 10-20 pounds of cover crop seed per acre. It’s best to follow the recommended seeding rates provided by the seed supplier. This will help ensure that you’re not over- or under-seeding, which can be an expensive mistake. But if you’re planting in a small area, you can simply use your hand to scatter the seed.

Step 3: Select the Right Time to Plant
In most climates, it’s best to plant cover crops during late summer or fall when temperatures are still warm enough for them to germinate and establish themselves before winter sets in. This will ensure that the cover crop gets a good start before winter hits, and it will also help prevent weed pressure in the spring.
It’s also important to consider the length of your growing season when selecting a cover crop. Some species, like clover, are better suited for short growing seasons, while others like alfalfa are better suited for longer growing seasons.
Step 4: Plan for Termination Options
Cover crops can be left in the garden through winter as green mulch or they can be mowed down and tilled into the soil. But before planting your cover crop, you should decide how it will be terminated. If you plan to leave the cover crop in place until spring, make sure to select a species that can tolerate cold temperatures.
If you plan to mow or till the crop in, then make sure to do so before it sets seed.
Step 5: Measure Soil Moisture Content
Before planting, make sure you measure your soil’s moisture content to ensure there is enough water available for the cover crops to germinate and develop. This will help prevent poor germination and reduce the risk of seedling disease. It’s best to measure soil moisture content using a soil meter, which you can pick up from your local garden center.
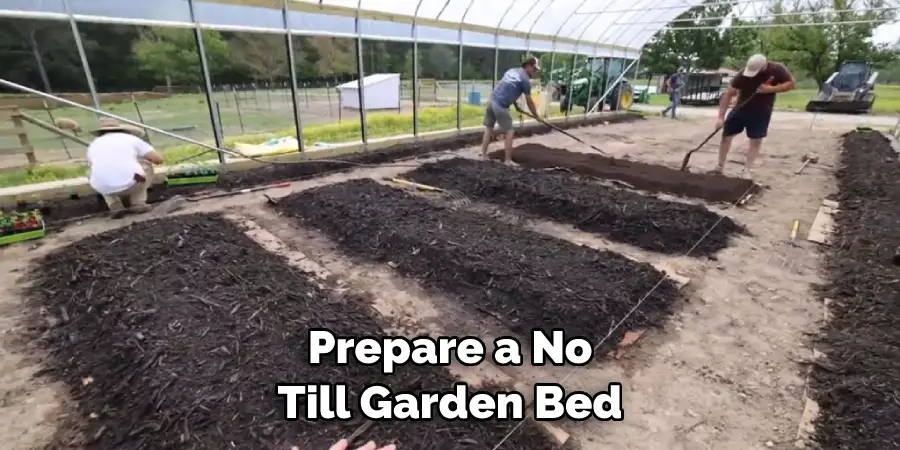
Step 6: Prepare the Garden Bed
Prepare a no-till garden bed by loosening up the top few inches of soil with a garden rake and removing any large debris or stones that may be present. Although you’re not tilling the soil, it’s still important to prepare the bed properly to ensure good seed-to-soil contact and optimal germination rates. But be sure to avoid compacting the soil while preparing it.
Step 7: Broadcast Seed Over the Surface of the Garden Bed
Broadcast seed over the surface of the prepared garden bed using a handheld spreader or your hands—just make sure to spread it evenly. It’s best to plant cover crops in the evening when temperatures are cooler and there is less wind, which can help reduce seed loss due to blowing away. Be sure to keep the seed moist until it germinates, which can take up to a week.
Step 8: Rake In Seeds
Once you’ve spread the seed, lightly rake it into the top few inches of soil to ensure good contact between the seed and soil. If you’re using a handheld spreader, it can help to use the rake to fill in any gaps or patches of soil without seed. But again, be sure to avoid compacting the soil. It’s best to water the bed after planting to help further ensure the seed has enough moisture for germination.
Step 9: Water Garden Bed
It’s important to water your garden bed after planting to help promote the germination of the cover crops. But be sure to use only as much water as the cover crops need. Too much water can lead to soil erosion and leaching of nutrients, and too little water can lead to poor germination and weak growth. You can use a garden hose or a drip irrigation system set on a timer to water the bed.
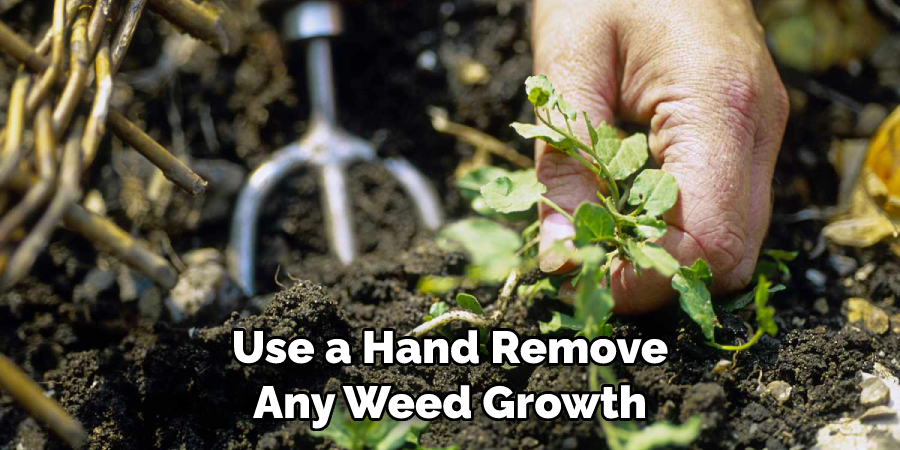
Step 10: Monitor Cover Crop Growth
Keep an eye on your cover crop as it grows, making sure that weeds don’t take over. If necessary, use a hoe or hand-pulling to remove any weed growth. This will help reduce the competition for water and nutrients, ensuring that your cover crop grows as best it can. It’s also important to monitor for signs of disease or insect damage and take action if needed.
Step 11: Terminate Cover Crops As Needed
When you are ready for harvest season, terminate the cover crop either by mowing down and tilling into the soil or by leaving it in the garden and using it as green mulch. Always be sure to terminate the cover crop before it sets seed, as this will help prevent weed pressure in the future. After termination, add any necessary amendments to the soil and you’re ready for planting your garden.
Following these steps on how to use cover crops in a no till garden will help you achieve success in your gardening efforts and ensure that the soil has all of the necessary nutrients for healthy growth. So get out there and give it a try!
Do You Need to Use Professionals?
If you’re just starting out, there are a few resources available that can help you with your cover crop planning. You may want to consider consulting a professional for help with seed selection, seeding rates, and termination options. There are also helpful resources available online that can walk you through the process of using cover crops in your garden.
By taking the time to properly integrate cover crops into your no-till gardening system, you’ll be well on your way to having a successful garden that produces nutritious food all season long.
How Much Will It Cost?
The cost of using cover crops in a no-till garden will depend largely on the type of cover crop you choose and the size of your garden. Generally, cover crop seed costs around $10 per pound, so 10-20 pounds of seed can cost anywhere from $100-$200. If you decide to hire a professional, their fees will also need to be factored into the cost.
Using cover crops in a no-till garden is an easy and affordable way to maintain soil health and ensure successful yields year after year. With just a bit of effort, you can have a thriving garden that provides nutritious food for your family for years to come!
Frequently Asked Questions
Q: How Much Cover Crop Seed Should I Use Per Acre?
A: Seeding rates vary by species, but generally, you should aim for 10-20 pounds of cover crop seed per acre. It’s important to select the right cover crop for your location, soil type, and planting window before sowing.
Q: When’s the Best Time to Plant Cover Crops?
A: In most climates, it’s best to plant cover crops during late summer or fall when temperatures are still warm enough for them to germinate and establish themselves before winter sets in.
Q: Can I Use Professionals for Cover Crop Planning?
A: Yes, you may want to consider consulting a professional for help with seed selection, seeding rates, and termination options. There are also helpful resources available online that can walk you through the process of using cover crops in your garden.

Q: How Much Will It Cost To Use Cover Crops?
A: The cost of using cover crops in a no-till garden will depend largely on the type of cover crop you choose and the size of your garden. Generally, cover crop seed costs around $10 per pound, so 10-20 pounds of seed can cost anywhere from $100-$200. If you decide to hire a professional, their fees will also need to be factored into the cost.
Conclusion
Cover crops are an important tool for any no-till garden, as they help to protect the soil, add nutrients, and control weeds. They serve as a sustainable solution when planted strategically, preventing soil erosion and supporting the growth of beneficial organisms.
Plus, having cover crops helps reduce labor and management costs associated with conventional tillage—so it’s really a win-win situation for any no-till gardener.
To get the most out of your no-till garden, be sure to select cover crops that are well-suited to your soil type and climate. Taking this extra step to utilize cover crops can greatly improve soil health and provide more productive yields in the long run. Now that you know how to use cover crops in a no-till garden
why not check out our helpful article on how to make a rain gutter planter? This is another great way to diversify your garden while conserving water and being environmentally friendly! Thanks for reading this article on how to use cover crops in a no till garden.
You Can Check It Out to Store Garden Soil
About
Outdoor Fixes is a distinguished figure in the world of Diy design, with a decade of expertise creating innovative and sustainable Diy solutions.
His professional focus lies in merging traditional craftsmanship with modern manufacturing techniques,
fostering designs that are both practical and environmentally conscious. As the author of diy,
outdoorfixes delves into the art and science of outdoorfixes-making, inspiring artisans and industry professionals alike.
Education RMIT University
(Melbourne, Australia) Associate Degree in Design (Outdoor Fixes) Focus on sustainable design, industry-driven projects,
and practical craftsmanship. Gained hands-on experience with traditional and digital manufacturing tools, such as CAD and CNC software.
Nottingham Trent University
(United Kingdom) Bachelor’s in outdoorfixes.com and Product Design (Honors) Specialized in product design with a focus on blending creativity with production
techniques. Participated in industry projects, working with companies like John Lewis and Vitsoe to gain real-world insights.
Publications and Impact
In diy, Outdoor Fixes his insights on indoor design processes, materials, and strategies for efficient production.
His writing bridges the gap between artisan knowledge and modern industry needs, making it a must-read for both budding designers and seasoned professionals.